Ipinapakita ang mga post na may etiketa na Weekend. Ipakita ang lahat ng mga post

Miyerkules, Marso 2, 2016

Canada Day Long Weekend Part II


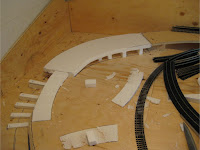
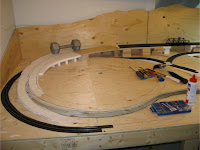
The next section that I wanted to complete was the stretch of track that would travel down from the trestle, below the main line, and loop back into the front switching are. This section will be part of a tunnel in the future, so I decided to complete it now before I did too much work on the tracks above it. The foam roadbed was the first step after planning the track path. Once again, I used thumb tacks to hold the roadbed in place while the glue dried.

Left tunnel foam trackbed installationFoam trackbed installation

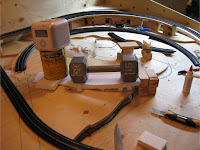
At this time I also installed the segment of roadbed for the section that will travel from the front staging area, around the lake area and up onto the mid-section of the layout. This will cross the part of track that descends from the trestle at a 60 degree angle.

Trackbed installation60 degree rail crossing construction

Construction of track on right half of layout


Sabado, Setyembre 12, 2015

Progress from this past weekend


Got a bit done on the layout this weekend, but not as much as I hoped.  My layout room is still a disaster from all the work I've done.  I hoped to "straighten" it, but it never happen.  The new area I put in over the summer is a shell of it's former self now.  I've got the scenery just about done.  Should hope to complete this weekend.  The main thing that is incomplete is the assembly of the sand unloader.  The silos are done but the small elevator is not.
Here is the overpass section near the light switch.  Alot easier to scenic when the section is removable.

Little retaining wall I put in the scene.

Super tree painting and drying rack.  These are outside getting their gray paint.  

Here's my rack inside and the tree making has begun!

Here my overpass foam before scenery.  Notice the light switch,


Scenery has gotten a little more vegetation and some rocks (made from plaster) from my old bridge scene.  Just needs some trees.

Another view

The scene in the upper right is complete with a trees and weeds on the small ridge.

The area is starting to come together.

Another view.  Need a few smaller trees on the ridge.

Another view of the ridge.


Huwebes, Hunyo 11, 2015

Weekend Project – Athearn Tank Car “Repaint” 100th Post!


Over the weekend I turned an Athearn RTR UTC 30,000-gal tank car that was originally decorated for DODX into one decorated for Procor (PROX). 


Lately my free time has been reduced a bit due to work demands, so I thought I’d attempt more small projects that I could reasonably accomplish in the span of a weekend. This past weekend I wrapped up the first of what will hopefully be a series of regular updates on this sort of thing. And, as it turns out, this is my 100th post - how time flies!

This week’s project involves redecorating an Athearn RTR Union Tank Car prototype 30,000 gal general purpose tank car. I say redecorating because I didn’t actually repaint the car. Instead, I took a ready to run model that was painted for the US Department of Defense (DODX) and used a Badger air eraser to scrub off the unwanted lettering. The air eraser is essentially a small grit blaster that can use baking soda or aluminum oxide as a blasting media (I use baking soda, it’s much cheaper than aluminum oxide). I carefully masked the areas to be removed, which allowed for preservation of most of the car’s original finish. I specifically chose the DODX car to start with as it had substantially less graphics to start with compared to other paint schemes of the same car. Also, it’s somewhat less desirable, so it was much cheaper to buy than some of the other RTR schemes.

After masking the areas to be removed, I blasted off the unwanted lettering outdoors. Doing so does take a sizeable air compressor due to the amount of air required, at relatively high pressure. After I was done, I rinsed the car with water and let it dry overnight. I then used Microscale’s set 87-1466 (Procor/PROX, Various Tank Cars) to reapply the desired lettering. The set is a great improvement over some of their previous offerings for Procor equipment, but still contains a number of inaccuracies. Using the air blaster, I was able to preserve some of the original graphics such as the “2 INCH HF COMP SHOES” on the side sill and the COTS decals. Lettering was pretty straightforward, using prototype photos found on Chris Vanderheide’s Canadian Freight Car Gallery website. I found a car only two numbers away; I chose PROX 44815 since the number was already aligned in the decal set and wouldn’t require any splicing of individual digits. In prototype, the car is used to carry condensate, essentially a thinning agent used in crude oil pipelines to improve viscosity. The real-life car was built in 2007 at UTC’s now-closed East Chicago, IN plant, and is one of many so-called “short GP30’s” in the fleet (General Purpose, 30,000-gal capacity, less than 60’ in length over pulling faces).  I enjoy decal work since it’s easy to see the results of one’s work, and in this case, pretty quick; the car was decaled in less than an hour. After decaling I used Testor’s gloss coat to seal the decals to the car. I will eventually weather the car lightly, as I model up until 2010, so the car would still be relatively clean and shiny in my modeling era.

‘Til next time,
Cheers,

Peter.

Miyerkules, Hunyo 10, 2015

Im back with a new video for Memorial Day weekend


Well I'm back for Memorial Day and wanted to give a moment to thank all the Veterans, including my dad that have made this great country possible.  I fly my stars and stripes in front of my house everyday.  It's been a busy time with me but I do see the light at the end of the tunnel.  I did find some time to shoot a video today.  I recently purchased a Minuteman Models I-Car and finally put the finishing touches on it yesterday.  It holds my I-phone and you can film as if the camera is mounted on the front of the locomotive.  The video is a mainline run around the whole layout, top section.  I will have a trip down the helix to the lower level very soon.  Only modification I would do is to get rid of the Kadee sprung trucks it comes with.  They like to pick switches.  See if you can find where I saved the video from a derail right after the first road crossing.


Huwebes, Abril 16, 2015

2014 Mid Atlantic RPM Meet this past weekend


Sorry no updates on the layout in this post but I do have several pictures from the Mid Atlantic RPM meet.   


My pictures are only from Friday's models that were displayed. I did not get the chance to get more pictures on Saturday. I'm a co-founder and overall it was a great meet in our second year. Over 250 models displayed and 18 dioramas/structures were displayed. 

http://www.pbase.com/vamidlandrr/2014_mid_atlantic_rpm_meet_fredericksburg_va

Linggo, Abril 12, 2015

Valley Forge RPM Meet this weekend


I will be attending the Valley Forge RPM Meet this weekend up near Philadelphia, PA this weekend.  I was planning on attending since Christmas but my hospital visit in January nixed that.  Norm Wolf called me about a month ago and wanted to see if I wanted to go.  He had reservations for him and his wife but she had something come up.  So I do get to go up there after all.  Looking forward to attending as a guess.  Our RPM meet in the Fall is a lot of work and you don't get to socialize as much as you would like.  Looking forward to seeing friends of this great hobby and just getting away for a few days!

2016 Valley Forge RPM Meet


Our RPM meet: Sept 30th and Oct. 1st
2016 Mid-Atlantic RPM Meet

Linggo, Marso 29, 2015

Canada Day Long Weekend Part I


With July 1st this year being on a Thursday, my work decided to shut down for IT upgrades on Friday as well, giving me a nice, long 4 day long weekend – plenty of time to make some serious progress on my model.

I first fixed my original ramps on the left side of my layout which I shaved these down and placed different sized risers underneath to make them much more level and smooth. I also laid track bed down on the right side for the section leading up to the future trestle (below, right).

Expanded foam ramp installationFirst completed sections of track

Expanded foam ramp

The second approach to the trestle is also constructed at this time. This unfortunately is going to be the most challenging part of the layout as far as track goes, as the total grade here is about 8% and isn’t very prototypical. This however, is a risk that just needs to be taken for the sake of the rest of the layout. I’m sure it will all work out in the end. Notice in the background that I am using Bachman E-Z Snap-Track to plan and grade around the lake. This track works great as a moveable template and grade planner when working with 18” radius curves.

Using snap tack as a template for trackbedExpanded foam ramp installation

Sabado, Disyembre 20, 2014

Canada Day Long Weekend Part III


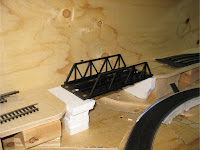
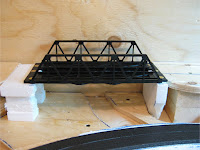
On Saturday, the third day of my long weekend, I decided to tackle the bridge that will carry both the main line and figure-eight line of track in the rear section of the layout. For this, I purchased a set of pier girders, as well as a warren truss bridge kit. With a little modification, I attached two bridge girders together using a 3rd girder. When these were dry, I attached bridge sides of the warren truss kit to the girder deck. Once all together, I used a few scrap pieces of plastic to add a little support to the trusses. The final look and design looks pretty good. I then placed the bridge onto my layout and fit foam supports on each end. I then finished with butting road bed right up to the bridge deck.


Warren truss bridge kitWarren truss bridge kit

Below you can see the new bridge on the back of the layout. It will still need to be painted to appear more prototypical, but this will happen at a later date. Also pictured below is the extension that I had to add to the left curve of the main line (under the 15 pound weight). This extension was the result of a measuring mistake I made early in my original planning. Thankfully this was an easy fix. Trackbed was also added at this time to both tracks at the rear of the layout.


Warren truss bridge installedCompressing foam ramps with weights

Railbed installation about half complete


Linggo, Marso 30, 2014

Progress since last weekend


I got a few things done on the layout last weekend and continued a little during this week.  Still working on Rappahannock Aggregate area with weeds and details.  I also starting adding signs and and other details to the road and road crossing to RA.

Here is the road to Rappahannock Aggregate.  Added a speed bump to hide a seam.  

Add some weed clumps to "vegitate" the area.  Got to find some more dump trucks.

Found a decent enough picture online to use as a backdrop.  Added some trees and bushes to make it look move believable.  The pic makes the backdrop pic stand out.    
 
These two ridges are for the spot in the background.  I will add trees to them.  Used the florist foam for the first time.  The Foam is definitely easier to paint.
On the lower level, I switched 2 industries around on the Mine Run Branch.  I switched the propane dealer and the woodchip loader.  It seems to me they fit better now.
This was the spot for the small propane dealer but the woodchip loader takes up less space in this spot.  I also did that homemade chip load with foam and sawdust.

This spot will hold two propane cars and is less tight for the larger propane tanks.  

Overview of the propane dealer.  The backdrop on the left is a print from online and the right is hand painted.  I need to add some more olive green to the paint!  


Miyerkules, Pebrero 19, 2014

Canada Day Long Weekend Part IV


On my last day off, I added the trackbed for the upper mountain tunnel lines. The outer track is part of the main oval line, which will descend down to the front staging area, and the second climbs from the mid-section up to the raised area at the rear of the layout. This line and the main line descent run together in one tunnel portal. You can also notice that the track below these lines is now laid. I completed this so I wouldnt have to work arond the upper sections of track in the future.

Foam trackbed installation using thumb tacksFoam trackbed installation using thumb tacks

This wraps up my Canada Day long weekend. My plan for the following week will be to get a good start on the large wooden trestle.