Ipinapakita ang mga post na may etiketa na Basic. Ipakita ang lahat ng mga post

Lunes, Enero 30, 2017

Basic Airbrush Maintenance and Cleaning Q A


Many different experience levels come and visit us here at Chinook & Hobby West to talk about Airbrushing. We also get many questions regarding Airbrushes through our social medias and by email.

We carry Paasche, Iwata and Badger currently and yes, we do promote these items. We also have general information to help all Airbrush users.

The following are some of your questions and answers we have researched for you.  If you still have questions, please email us at hobbywest@shaw.ca.


Q: Why should I use SuperLube?
A: When you’re using a substance to lubricate your airbrush needle (or trigger) you run the danger of some of that substance getting into the spray and onto your project (that’s why you only need a little bit). The question is what will happen when that greasy substance reacts with your paint. SuperLube doesn’t like to react with oil-based or water-based paints – that’s why we recommend it – we know what it will do. If you use an oil-based lube it might react with your acrylic paints (it’ll mix like oil and water).
Another suggestion is Woodland Scenic Light Gear Oil.  As with any Oil, please test your airbrush on a scrap paper or project just to ensure your oil doesn't interfere with your paint work.

Q: Why do I need to lubricate the needle?
A: The needle doesn’t really need the lube rather the needle in turn lubricates a little o-ring deep in the body of the brush that prevents blowback. It’s really rather small so it doesn’t need much lube and it only needs to be lubed every now and then.


Q: Are airbrushes hard to keep clean?
A: No, it’s quite a simple task, though it might be difficult at first. Develop a regular maintenance habit of rinsing the airbrush with the appropriate cleaning agent for the material being sprayed between color changes. Thoroughly clean your airbrush at the end of the workday. Check out the appropriate cleaning guide for your brush online or come down and see us to help you find a copy.

Q: How often should I thoroughly clean my airbrush?
A: It’s easy to say that you should clean your airbrush at the end of each workday; however, you should thoroughly clean the airbrush when the inevitable buildup of dried paint begins to interfere with normal operation. For some people this is once a week, for others, it’s once a day. It should be noted that regular and timely rinsing of wet paint with the appropriate cleaner will lengthen the amount of time between thorough cleanings. In short, rinsing more means cleaning less.

Q: How do I rinse my airbrush?
A: To rinse out the airbrush, simply flush it with the appropriate paint cleaning agent – Medea Airbrush Cleaner for water-based paints and paint thinner for oil-based paints. Never immerse or soak an entire airbrush. When using flammable cleaners never flush the airbrush near an open flame or lose electrical wiring and always flush the cleaner into an appropriate container to deal with these materials.
Q: How often should I rinse my airbrush?
A: You should rinse out the airbrush generally in-between color changes, before taking a break, and at the end of the day. Here’s why – wet materials clean up easier than dry materials. Rinse it while it’s wet and you won’t have to do a thorough cleaning as often when it’s dry. Rinsing between color changes is a maybe. If you’re blending colors and working from light to dark then chances are good that you won’t have to rinse. If you need a pure color then you will have to rinse out your airbrush.


Q: When I’m thoroughly cleaning out my airbrush why should I use a solvent?
A: Solvents quickly break up the molecular bonds paint forms when it dries. We recommend acetone or lacquer thinner as solvents, but stay away from paint thinner – paint thinner, in our experience, doesn’t seem to work well cleaning airbrushes. Do not soak your airbrush in a solvent. There are parts and greases in other areas of the airbrush that don’t take kindly to it. With that said, you should generally use only as much solvent as can be held in a cotton swab or in a pipe-cleaner. WARNING: DO NOT SPRAY SOLVENTS THROUGH THE AIRBRUSH. Bad idea, here’s why.
Q: What about Medea Airbrush Cleaner? Can I use it to clean out my airbrush instead of solvent?
A: There’s a saying-”the right tool for the right job”. Medea Airbrush Cleaner is great stuff and it works really well on wet paints and materials. Paint is a suspension of pigment in an adhesive substance. When the adhesive is wet you can wash it off with soapy water-when it is dry, you need something to dissolve the molecular bonds the adhesive creates. This is where solvents such as acetone or lacquer thinner come into play.


--------------------------------------------------------------------------------


Source

Thank you for checking out our Blog.  Please visit our Website, Facebook and Newsletters.


Sabado, Abril 9, 2016

Basic Slot Car Maintenance Part 2


Make sure to check out Part 1 of our Basic Slot Car Maintenance to learn:

  • Fixing track to a Baseboard
  • Power drops and breaks
  • Testing Lane Change sections


Welcome to the exciting hobby of Slot Cars.  At the beginning it is great fun, until everything starts to hesitate and slow down. That's when you need to look after your setup so you can continue with maximum enjoyment of your Slot Car experience.

You are here to learn abut how to maintain your Slot Car setup before it needs major maintenance (we hope we've caught you in time, lol)

Weather you have a small and simple setup or a 4+ lane for club racing, the proper cleaning routine is needed.


Cleaning

Scalextric track

Since the year 2000, Scalextric amended the track design to improve the rigidity of the track and the ease of assembly. It is now possible to simply push two track pieces together in order to connect them, no need for fiddly connectors.

Cleaning Scalextric track

Light cleaning of track surface for daily use: Use a damp cloth or very lightly oiled cloth. This removes light grime and dust from the track surface. Wipe surface dry after using a damp cloth. As matter of good practice, always do this before using the Scalextric layout as this will help ensure you get the best grip from the car tyres.

Older Scalextric track

Track produced before the year 2000 is known as Classic track. It can be identified by the round popper track connectors.

Cleaning Classic track

Light cleaning of track surface for daily use: Use a damp cloth or very lightly oiled cloth. This removes light grime and dust from the track surface. Wipe surface dry after using a damp cloth.

Track rails

Unless kept in perfect conditions, older track rails will acquire quite a dark tarnish to the pick-up rails and this will prevent the right amount of current getting through to the motor. To remove the tarnishing or oxidisation, try a Hornby Railways track rubber to see if some of the surface tarnish can be removed.

Corrosion and heavy tarnishing

Use a mild abrasive material to shine up the running surfaces of the pick-up rails, making sure that the male and female connections at the ends of the track sections are also bright and shiny. Be aware that sometimes no amount of cleaning of heavily corroded rails and connectors will return the track to a useable state and replacement of track in this condition is the only alternative.


Cleaning and Lubricating The Chassis

Scalextric cars do not require additional oiling when used, say, for racing for fun. However, if you wish to improve the performance of your car there are several things you can do.

Top Tip: Lubrication of moving parts.

Level: Beginner - use these instructions if you have basic hobby skills.

Tools required: Small philips screwdriver, small stiff brush, 3-in-1 oil.
  1. Remove the chassis from the car body.
  2. Use a small stiff brush to remove the dust and dirt from the interior of the chassis
  3. Use tweezers or similar to remove debris entangled in the axles and wheels
  4. Place one drop of light 3-in-1 oil to each of the axle bearings and to the motor shaft bearings
  5. Wipe off any excess oil
  6. Re-assemble the chassis to the car body
  7. Test the car on track

Level: Expert - Only carry out these steps if you are an experienced hobbyist

Tools required: Small philips screwdriver, small stiff brush, tweezers, 3-in-1 oil.
  1. Remove the chassis from the car body
  2. Remove dust and dirt from the interior of the chassis
  3. Remove impacted or loose debris at the axles, wheels, bearings, gears and, very importantly, between each tooth of the motor pinion gear and main axle gear wheel
Place one drop of light 3-in-1 oil to:
  1. each of the axle bearings
  2. the motor shaft bearings
  3. guide blade shaft (remove guide blade screw)
  4. thread of each chassis screw (during re-assembly)
  5. Wipe off any excess oil
  6. Re-assemble the chassis to the car body. Tighten the body screws fully (do not over-tighten) then back off the screw by one complete turn to leave the chassis slightly loose to the car body. This may not be appropriate for open wheel cars, but as a general rule this will improve performance. Test the car and adjust the screwn tightness accordingly.
  7. Test the car on track


Guide Braid/Blade Replacement

What is the guide and braid?

The guide is normally a small 'keel' (but can be a pin as used in Micro Scalextric) which runs in the track slot and guides the car around the track layout.
The braid is fitted to the slot guide blade assembly. It allows electrical power to pass from the track rails, up through the braids and into the car to power the lights, motor and, if fitted, a digital chip, etc.
With regular use, the braid will eventually wear out and will need to be replaced. Regular maintenance and care can see a braid last for the life of the car.

To keep the braid in good repair:

  • always clean them with a small stiff brush (an old toothpaste brush is ideal)
  • ensure that the braids are flat against the guide and not angled down
  • ensure that the braids are positioned so that they are in line with the track slot rails.

Replacing the braid

Since 1990, an easy-fit system has been used and most Scalextric cars have a very simple push-fit method of replacing the braid.

Replacing the guide blade:

Guide blades do not wear out and will only need replacing in the event of breakage. The easy-fit guide blade can be replaced from the exterior of the car without the need for tools. The recent C8329 round guide blade requires a screwdriver to gain access to the interior of the car to release the guide blade retaining screw.


We carry Scalextric 1:32 scale Slot Cars. We are expanding our selection for the slot car season of 2014-2015 (November to March).


source

Miyerkules, Nobyembre 18, 2015

Basic Slot Car Maintenance Part 1


Welcome to the exciting hobby of Slot Cars.  At the beginning it is great fun, until everything starts to hesitate and slow down. That's when you need to look after your setup so you can continue with maximum enjoyment of your Slot Car experience.

You are here to learn abut how to maintain your Slot Car setup before it needs major maintenance (we hope we've caught you in time, lol)

Weather you have a small and simple setup or a 4+ lane for club racing, the proper cleaning routine is needed.


Fixing Track to a Baseboard

Ideally, it is best not to nail, screw or glue the track to a base board at all. The reason for this is that plastic and metal, the two ingredients of Scalextric track, expand and contract at different rates. So, on hot days the plastic will expand larger than the rail. Of course, the rail won't let the plastic expand evenly due to the rail gripping the plastic. This causes the track surface to warp.
When the track is laid loose the circuit can 'grow' and absorb any expansion due to heat. If the track is not allowed to move freely (ie nailed down) then any expansion will only lead to uneven surfaces.
If the layout is to lay flat, leave the track loose. Keep the layout in a dry and constant temperature room. This normally means that the loft, shed and garage are not good places.


Power Drops and Breaks

The most often asked question is 'My car has stopped on the track. What has broken?'

The most common (1 =most common) reasons that this might happen are:
  1. The track piece that the car is resting on has no electrical power due to bad track connections.
  2. The car motor has expired or their is a mechanical reason within the car that is stopping the motor from turning (e.g. tyre jammed against wheel arch).
  3. A guide braid has come out.
  4. The hand controller is not plugged in to the power base fully.
  5. The electrical power switch is turned off.
  6. The car has developed a fault.
  7. The hand controller has broken.
  8. A motor wire has broken.
  9. The power base has broken.
  10. The power base is not connected to the power supply.
  11. The power supply lead is broken.
  12. The power supply has broken.

Here's how to cure the most common problem of electrical power problems on the track - No 1 above.

When the following procedure has been completed you should be able to race cars at full speed on tracks of up to 200 feet or more without any practical electrical problems.
Power jumper cables can be used on 'analogue' or digital track circuits. Note, though, that a power jumper cable only hides a bad track connection and, ultimately, it is better to fix the track problem than add power jumper cables.
Question: There are power breaks or weak power sections on the Scalextric layout. How can this be repaired?
Answer:When a car stops on circuit this can indicate TWO breaks in electrical continuity since electricity travels in both directions around the track. If there was only one break then you would not notice it as electricity flows in both direction!

The way to correct this problem is to:

  • Disconnect the track behind the power base.
  • Then drive a car forward at a slow speed. When the car crosses from one piece of track to the next there should not be a drop in power/speed.
  • If there is a drop or loss in power, then fix the track connection. Disconnect both track pieces (the track piece immediately before and after the fault). Turn them over on a hard surface. Ensure that the metal rail tabs at the ends of the rails (there are 8 of them on every track piece) are fully pressed and clamped down to the plastic. Use a stout screwdriver or similar to push them tight.
  • Watch this video on how to do this Track tab maintenance.
  • Reconnect the repaired track pieces and retest by placing the car back at the power base and again drive the car slowly forward until you meet the next reduced or lost power section.
  • Continue the above repair process until you get to the last track piece before the power base.
  • Reconnect the last track piece to the power base.
  • Full power should now be restored.

Testing Lane Change Sections


In the event that a lane change track piece fails to operate follow this simple procedure:

  • Disconnect the lane change track piece and check that the rail connections are all good. See other Top Tips feature regarding track connections and loss of power.
  • Check that there are no obstructions in the slot preventing the flipper from physically moving. It should 'flip' freely.
  • Ensure that the track piece hasn't been bent (stood on, for instance) which will also cause the flipper to jam.
  • Reconnect the track piece and turn power on.
  • Manually move the flipper in to the position which would cause the car to change lane. Manually push a car over the track lane change sensor (this is a round hole about one car length before the flipper). The flipper should flip back to the 'straight ahead' position.
  • The lane change track piece should be usable if the above procedures have not identified any problems.


We carry Scalextric 1:32 scale Slot Cars. We are expanding our selection for the slot car season of 2014-2015 (November to March).


source

Lunes, Hunyo 15, 2015

Basic Airbrush Q A


Many different experience levels come and visit us here at Chinook & Hobby West to talk about Airbrushing. We also get many questions regarding Airbrushes through our social medias and by email.

We carry Paasche, Iwata and Badger currently and yes, we do promote these items. We also have general information to help all Airbrush users.

The following are some of your questions and answers we have researched for you.  If you still have questions, please email us at hobbywest@shaw.ca.

Airbrush Classes for Beginner to Expert
Email us for Class list


Q: What is an airbrush?
A: An airbrush is a small, air-operated tool that sprays fluid (paint, ink, dye, stain, glaze, etc.). It resembles, and is held like, a pen. It applies paint through a process known as atomization.


Q: What's atomization?
A: An airbrush takes a fluid and turns it into a directed airborne mist. You can think of it as a sophisticated perfume atomizer or as a controllable spray paint can.


Q: How does an airbrush work?
A: The airbrush must be attached to an air source to spray. Airbrushes have two systems that must work together to function properly. The air system provides energy for the atomization of the fluid. The fluid system delivers the paint to the tip of the airbrush to be atomized and sprayed onto a surface.


Q: What type of airbrush is best for me?
A: This depends on your desired application. Most airbrush users today use single- or dual-action, internal mix airbrushes because they offer the most control and the finest of sprays. However, single-action, external mix airbrushes are very popular for hobby and craft applications, the spraying of ceramic glazes or high viscosity materials, or where cost is a factor. (They are generally less expensive.)

Q: What is the difference between internal-mix and external-mix?
A: In an internal-mix airbrush, the air and paint mix inside the paint tip. This produces a thorough atomization or mixing, which results in a very soft, fine spray pattern. In an external-mix airbrush, the air and paint mix outside the tip, producing a coarse spray pattern.


Q: Why are there different size tips for the airbrush?
A: Nozzle sizes are differentiated by tenths and sometimes hundredths of millimeters. The different sizes allow for finer or coarser paint (how finely the paint pigment is ground up) while trading off between finer and coarser lines and spray patterns. The line sizes are relative within the Iwata product line. A practiced hand and deft touch can accomplish some amazing lines and effects with a .5mm nozzle on the Eclipse or Revolution series airbrushes.


Q: What types of surfaces can be worked on?
A: All surfaces can be airbrushed, paper, canvas, plastic, metal, glass, wood, leather, skin, etc. The key is to insure the proper preparation of the surface prior to spraying and its compatibility with the sprayed material.


Q: What kinds of paint can I use with the airbrush?
A: All paints, oils, acrylics, watercolors, automotive paints, enamels, alkyds, etc., are sprayable as long as they are thinned to a consistency, like light cream, that enables them to flow easily through the airbrush. However, if you're just learning how to paint with an airbrush consider buying airbrush ready paints then you can focus on improving your technique rather than worrying about whether or not your paint is going to clog the airbrush.


We have two great Airbrush DVDs that can help you with your technique.  We also have informative books and brochures and if we do not have your replacement parts in stock, we can order them.


Source


Thank you for checking out our Blog.  Please visit our Website, Facebook and Newsletters.


Miyerkules, Marso 11, 2015

Basic Slot Car Maintenance Part 3


Make sure to check out Part 1 of our Basic Slot Car Maintenance to learn:
  • Fixing track to a Baseboard
  • Power drops and breaks
  • Testing Lane Change sections
and Part 2:
  • Cleaning
  • Lubricating the Chassis
  • Guide Braid/Blade replacement.


Welcome to the exciting hobby of Slot Cars.  At the beginning it is great fun, until everything starts to hesitate and slow down. That's when you need to look after your setup so you can continue with maximum enjoyment of your Slot Car experience.

You are here to learn abut how to maintain your Slot Car setup before it needs major maintenance (we hope we've caught you in time, lol)

Weather you have a small and simple setup or a 4+ lane for club racing, the proper cleaning routine is needed.


Tire Maintenance

Cleaning the tires gives the greatest amount of benefit to car performance.
Before using these tips, ensure that the track surface is clean and dust free.

For the novice:

  • Clean the rear tires with a slightly damp cloth.
  • Dry the rear tires.
  • Test the car on track.
A good tip is to visually check the colour of the rear tyres. If they are grey (the colour of dust) then they need cleaning. Repeat the process of cleaning and testing until the tires remain black after a track test. Then, the tires are ready to produce the best results.

For the experienced racer:

  • Clean the tires with tape (masking or gaffer tape or similar)
  • Test the car on track.

For the advanced racer:

  • Clean the tires with tape
  • Apply 3-in-1 oil (or similar) to the tire surface. Rub it in to the tire surface.
  • Gently remove any excess oil from the tire surface. Tires can be moist but not wet.
  • Test the car on track.
Tire truing is also recommended for the advanced racer and involves running the rear tyres on a flat surface of sand/glass paper to wear the tyres down to a smooth flat surface where 100% of the contact area touches the track surface.


Magnets & Downforce

What to race : A Super Resistant or Fully Detailed car?
Let's use the Audi R8 GT3 as a comparison. It comes in detailed and super-resistant form. With two cars of the same make,  in super-resistant and detailed build, the differing down-force between each car might influence your choice depedent upon what type of circuit you race on.

The magnets on both cars are the same so why the difference in down-force?
A super-resistant Audi R8 has a weight of 87 gm and a magnet force of 260 gm. This down-force is measured with the magnet fitted to the car. The overall downward weight on the track is, therefore, the force of the weight of the car and magnet together. E.g. 260gms. The magnet accounts for a force of (260-87) 173gms.
A detailed car has a higher weight of 93 gm and a magnet force of 277gms. The magnet added a force of (277-93) 184gms.

The 11gms difference between both cars is accounted for by no two magnets being alike in terms of their magnetic attraction (gauss value). Other factors such as flexibility of the chassis also come into play as does the condition of the track, thickness of the tyres, etc as the distance of magnet from rail is critical and exponential. The magnet being twice as close to the track doesn't mean it's effect is two-fold - it could be tens times stronger! So differences in all of these areas can make significant differences.

From a practical point of view, for racing both cars have good performance. This car does race well and feels sure-footed, even for those racers who prefer to race without a magnet (which is the best way to race in my opinion!).
Pros and cons are:
A light weight super-resistant car is superior on smooth track and/or long straights since it won’t be inclined to de-slot and can accelerate to top speed far quicker than a heavier fully detailed car. For circuits with bumps or only short straights a heavier car is recommended because the extra weight is required to keep the car in the slot and not so much is time is wasted accelerating along short straight lengths of the track.
If you have a car that sticks to the track too much check the underpan to see if the magnet can be moved to a different position. Usually, moving it foward lessens the downforce effect. When you are ready for more of a challenge, try removing the magnet completely. It's interesting to note that most Scalextric clubs ban the use of magnets!
---weights can also be used to increase downforce


Motors - An overview

An overview of Scalextric motors.

Scalextric motors are rigourously tested to help ensure that the Scalextric car is fitted with a motor that has good durability and will give many years of serviceable life without problems.

Is maintenance necessary?

Generally, a Scalextric motor needs no maintenance at all for the average home user. In fact, the car is built so that access to the motor is difficult. This is to comply with toy regulations and means that the motor has to be durable and maintenance free.

Maintenance for the enthusiast.

Enthusiasts may want to ensure that the motor is running at its optimum. Therefore, with chassis removed, it is possible to add a single drop of oil (3-in-1 light oil) to the ends of the motor shaft. Whilst this maintenance is carried out it is also good practice to clean all moving parts such as the pinion and axle gears and the axle bearings and lightly oil these components. Electrical contact cleaner can be used to clean the internal motor brushes but be sure to only carry out this maintenance on a cold motor.

Motor specifications

Scalextric motors are expected to be used at 12 to 15v. In practice they will work up to 18v without much problem. Above 20v seriously shortens the life of a motor.
In basic terms, current draw is 0.5 to 1Amp. However, strength or magnet, weight of car, grip of tyres are but just three factors that effect current draw.
Note that the current draw will only, and can only, be no more than the current available from the power source!
We recommend that only Scalexctric power supplies are used.
The standard Mabuchi S (SP) can motor or Mabuchi slimline motor (FF) fitted to most Scalextric cars are rated at 18,000 r.p.m. measured at 12v.

Performance Motor range

Motors can be changed for higher revving motors. See our Performance Motors range.
This range has 20,000, 25,000 and 30,000 rpm motors available.

Car Tuning

We do not recommend that any tuning is performed on an electric motor other than a spot of oil placed on the external motor shaft bearings - now and again. However, the components that act with a motor to deliver forward motion can be tuned. Adding a higher revving motor doesn't neccessarily mean quicker lap times or a better handling car! Different gear ratios can be used to effect the acceleration and braking of the car to improve the overall balance and performance. This is where tuning becomes more of an art. There are no strict guide lines to say what is best as so much depends upon such elements as driving technique, motor, car balance, tyre grip, track surface, hand controller, gear ratios and shape of track circuit - to name but a few variables - but making changes one step at a time and recording the differences is a steady logical way to go.

-----------------------------------------------------------

Extras

Performance Tyres

The performance range of tyres will fit most Scalextric cars.
Here's a brief guide to indicate which tyres will fit your car for those extra fast lap times.

C8413-Le-Mans-TyresC8413 - set of 4

Porsche 997
BMW 318Si
Aston Martin DBS
Dodge Viper
Peugeot 908
Nissan 350Z
Ford GT 2004
Nissan Skyline JGTC
Ford Mustang FR500C
Lamborghini Gallardo
Porsche Spyder
Ferrari F430
Maserati MC12
Aston Martin DBR9

C8414-Single-Seaters-TyresC8414 - set of 4

F1, Indy, A1GP cars.

C8415-American-Classics-TyresC8415 - set of 4

Chevrolet Camaro
Chevrolet Corvette Stingray
Ford Mustang
Ford Torino
Ferrari 330 P3/P4

C8416-Rally-TyresC8416 - set of 4

Chaparral 2F
Subaru Impreza
Ford Focus
Peugeot 307
Alfa Romeo 159
Seat Leon
Porsche 911 GT3R


We here at Chinook & Hobby West, would like you to have the maximum fun with your Slot Car set.  Please feel free to come down and talk to us about showing you how to clean and maintain your cars and tracks or to upgrade your cars to Digital.


We carry Scalextric 1:32 scale Slot Cars. We are expanding our selection for the slot car season of 2014-2015 (November to March).


source

Huwebes, Marso 5, 2015

Basic Tips For Figure Painting


– From Chinook & Hobby West

1.      Wash all plastic parts in a grease cutting soap to remove oils and release agents.
2.      Inspect, clean, trim and sand as needed.
3.      Prime with white or gray so features stand out.
4.      Plan out your colours for your project.
5.      Paint basic colours. Go from light to dark. Paint flesh & eyes, white, tan, etc.
6.      Select colour wash in dark versions of your painted piece. Brown for flesh, Navy for uniforms, black for battle worn.  Dilute paint with water or thinner at a one to one mixture.
7.      Do highlights and lowlights, as needed using dry brushing.
8.      Seal your piece by spraying with dullcote (matte finish), glosscote or preference.
9.      Glue (or place if movable) onto your diorama.

Remember


  • Take your time
  • Be patient – Mistakes can be fixed
  • HAVE FUN!!!


Huwebes, Mayo 15, 2014

Basic ho train set


Ho scale train sets train sets only, Train sets only has one of the largest selection of in-stock ho scale train sets on the internet. please select one of the manufacturers below to narrow your selection.. Ho trains sets ebay, Find great deals on ebay for ho trains sets and train sets. shop with confidence.. Model railroading 101 - the basics, Model railroading 101. share buying a model train set you'll also want to the size of a real train. for example, an ho scale locomotive is.
Model trains – ho scale – how to videos on monkeysee, Ho trains are the most popular scale of model trains and there are two basic kinds of track that you are i would encourage you as you select a train set,.

Basic ho train set

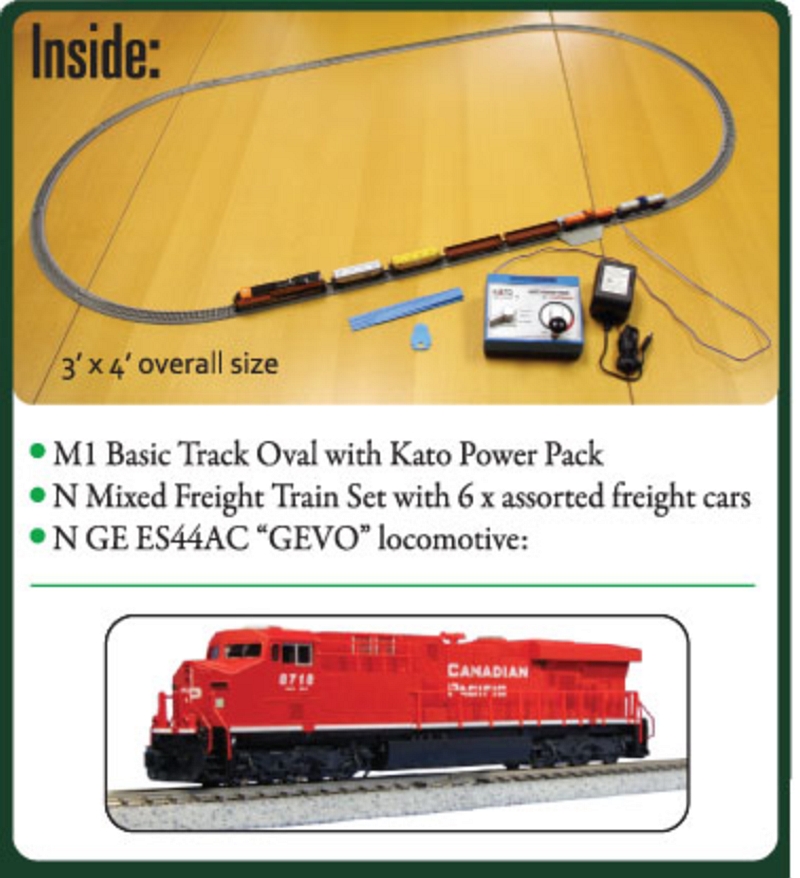
ORDER DEADLINE ALERT - Kato N Scale GE ES44AC Starter Train Sets
HO-IHC-SP-SOUTHERN-PACIFIC-SHASTA-SPECIAL-SP-LOCO-amp-3-CAR-TRAIN-SET
track plans benchwork track plans layout plans track an ho scale plan
Track plans benchwork track plans layout plans track an ho scale plan
HO Train Layouts Part 2 Model Train Layout Photo Galleries, Videos
Basic Bachmann Ho Track Plans model train layouts n scale PDF Download
Bachmann Thomas and Friends Model Train Unboxing - YouTube

Sabado, Mayo 10, 2014

Basic Tips For Model Building


Basic Tips For Model Building
– From Valerie at Chinook & Hobby West

  1.      Wash all plastic parts in warm water and liquid dish soap.  Use a grease cutting soap such as Sunlight. Do not use soap that claims to be ‘nice to your hands’ because these soaps are designed to replace skin oils in your hands.  They will put oils on the plastic.  You are trying to get rid of the oils and mold release (anti-sticking agents) from the plastic.
     After letting the plastic soak for 10-15 minutes, agitate the water to get the soap into any cracks or grooves and then rinse with clean water.  Let the plastic air-dry.
     Your model is now clean and ready for painting.  You should get in the habit of washing your hands in the same soap anytime you work on your model, both building and painting.  Grease cutting soaps will help to reduce skin oils on your hands better than bar soaps and therefore reduce the chance of getting fingerprints on you model.
  1.     Remove parts from their frames only as you need them.  Once all the parts have been removed from a section of frame (sprue), save the frame, it has many uses and costs nothing.
     A section of frame can be used to mix your paints.  It can also be used to test the dryness of the paints on your model.  If you are doing a paint scheme where one color will overlap another color, paint some of the first color on a section of frame at the same time that you paint your model.  When you think that the paint is dry, paint some of the second color on the frame over the first color and wait for about 15 minutes.  If there is no reaction, then it’s safe to paint the second color on your mode.  Repeat this step if further colors are to be used on top of the other tow, such as I a multi-colored camouflage scheme.  This process can also be used to test the dryness of your finished paint scheme before applying clear coats.  If you intend to use clear coats on your models, always install your clear parts AFTER you use the clear coat.  Clear finishes will cause clear parts to fog. Also test the clear coat on your painted frame as some brands of clear coat can cause yellowing to light and white colors.  Install clear parts by using clear drying white glue, as regular model glues will fog the clear parts too.

Building Your Model

  1.    After removing the parts from the frame, remove any excess plastic from the parts using your hobby knife, sandpaper, sprue cutter or a file.  When using files be very careful as the plastic is soft and you can take off too much.
Dry fit the parts before gluing to make sure the parts fit firmly.  (Known as dry    fitting). Further sanding may be required.  Apply glue sparingly. The more glue you use, the worse it sticks.  This applies mainly to tube glue.  The thicker you apply any glue the longer it takes to dry.  When using tube glue, us glue tips.

To Prime or Not To Prime?

  1. You will get different opinions on this but we suggest the following;
    • Pre-paint parts that will be difficult to paint after assembly, such as aircraft cockpits.
    • Assemble parts first that will end up the same color.
    • Assemble parts first when putty will be used to fill seam lines such as aircraft body parts and the paint.
When pre-painting parts, be sure not to get paint on the area where the glue is to be applied.  The glue will not stick through the paint.
The most important thing to remember about building models is:
·        Take your time!!
·        Give paints time to dry!!
·        Give glue time to dry!!


If you have any questions please call us, we can help you.  403-243-1997 or email hobbywest@shaw.ca.

Basic Tools To Have On Hand When Model Building

  • Model glue (superglue works well too)
  • White glue or canopy glue (for clear parts)
  • Hobby Knife
  • Sprue Cutter (optional)
  • Water (if working with acrylic paint)
  • Thinner (if working with enamel or laquer paint)
  • Acrylic (water based) or Enamel (oil or laquer based) paint
  • Paint brush(s)
  • magnifying lense (helps to see numbers on sprues and small print on instructions)
    • A SENSE OF HUMOUR AND SOME PATIENCE!