Ipinapakita ang mga post na may etiketa na Tips. Ipakita ang lahat ng mga post

Biyernes, Enero 13, 2017

Tips for Restringing or Retightening Action Figures


Over the years, we have purchased many collections with action figures in pieces because the elastics broke. We have also had parents come in asking if we repair action figures or if we can show/tell someone how to fix one.

Rob can show you. It is fairly easy if you are patient and have a steady hand.  But because Rob is pretty busy and hard to nail down, he found an article that should help you out with some great tips, references and steps.

The following is taken from that article and there is a link at the bottom of this post so you can go see what else you can do to fix up those figures.

Before you read the article, here's a few things you may want to have on hand for when you're ready to fix your action figures.

  1. a various selection of small 'O' rings or elastics
  2. a sectioned container to sort the 'O' rings
  3. a couple sizes of crotchet hooks (they come in metal, plastic & wood and can be found at craft stores)
  4. fine tip craft scissors or sprue cutters
  5. set of hobby screwdrivers


Are you sitting comfortably?  Then let's learn something neat!

------------------------------------------------------------------------------------------------------------

Idea 1
The best way to tighten your Action Figure involves a partial re-string. You need to shorten the single elastic (or you can use a new 'O' ring to reconnect the pieces) that connects the two legs and the neck. You need a long tool with a little hook on it like a crochet needle and a thin phillips screwdriver.
  1. Holding Joe securely, pull his head away from the neck hole until you see the elastic that loops around the neck hook.
  2. Push the screwdriver or crotchet hook through the loop to hold it securely above the neck hole.
  3. This will allow you to easily unhook the neck from the elastic.
  4. Set the head/neck aside.
  5. Pull and separate the lower section away from the upper.
    Now you will have Joes two legs and abdomen section free to work on. 
  6. You can shorten (tighten) the elastic by folding it an inch or so and then stitching it at that fold point. Make sure you stitch it securely.
    Now you can "re-string" Joe by putting the hook down through the neck hole past the arm elastics and out through the bottom of the chest hole. 
  7. Hook your tool onto your tightened elastic and pull it up through the neck hole again. This will take alot of elbow grease. It will be very tight now..
  8. Once you get it pulled just past the neck hole, stick in your screwdriver again to hold it above the neck hole.
  9. Now, you can easily rehook the neck hook to the elastic.
  10. Pull out the screwdriver, and you're done.
Joe is back to tight fighting shape! This process will also work for restringing or tightening the arm elastic as well. It sounds a little tough, but once you do it, it becomes really easy. -- John Medeiros


As for the floppy joints, I suggest the following (but only if you are brave): Grab some slide lock pliers, (you know, the big ones you use on the sink) and squeeze each pin and rivet gently until it begins to compress. Use the very edge of the plier face, and avoid contact with the plastic. I found this works better that tapping the joint with the hammer because you can watch the joint for stress cracks and stop at any time. You may experience a little paint flaking, but that is easily repainted. You also may want to wrap the pliers in a thin cloth. -- John

Idea 2:
I repaired a Cotswold Elite figure that had its arms come off. Anybody that has seen the cord inside these things should understand why. Here is how I fixed him:
  1. Get a rubber band, the size that is used on newspapers and triple it up.
  2. Take two bread twists and twist them together to form a piece about 4 or 5 inches long.
  3. Tie one end of the bread tie to the rubber band, after attaching the rubber band to one of of the arms, and thread the bread ties along with the other end of the rubber band through the body.
  4. Hook the other end of the rubber band on the other arm hook and then untie the bread ties. Your arms should snap right into place.
I don't know how long the rubber band will hold before it becomes brittle. It can't be any worse than that stupid cord that is in the figure though. This actually is a pretty easy fix as far as the arms are concerned. Give it a try if you ever have a figure do this to you. -- Jem


Other Ideas
Restringing arms and legs is easy except for the hip pins. They can be tricky to remove with out breaking them. Try a small awl or leather needle to pop them out. Then use some rubber cement to put them back in. To pull the rubber strings I use a coat hanger. The end makes a good hook and it is easy to pull the leg string out of the neck hole to attach the head. Do the same with the arm string . Hook one shoulder then pull the string through with the hanger and connect the other side. -- LordVader

When restringing arms and legs, I don't bother with the thigh pins myself. I leave them in if still serviceable. I bought a little bag of teeny tie wraps (the zip strip type) and just tie wrap the elastic loop to the still in there thigh pin. It works great with no noticable looseness for the extra .05 extra distance. -- Aaron


To read more of this article CLICK HERE

Please leave a comment about this post.


This blog post is opinion only and any damage/injury or loss to product or person is the responsibility of that person and Chinook & Hobby West and it's employees are not responsible.

Biyernes, Oktubre 14, 2016

Decal Tips


Our Staff has complied some Decal Setting Tips:

There are so many ways to decal, almost as many ways as there are decals!
Here is one of the easiest:
 - do a light spray coat of the same finish as the decal (gloss for glossed decal, matte for matte decal) let dry.
 - apply waterslide decal and position, let it dry then apply decal set to get the decal to snuggle into place.
 - when dry, clear cote with your desired look (matte, gloss, satin, etc.)
 
~~~~~~~~~~~~~~~~~~~~~~~~~~~~~~~~~~~~~~~~~~~~~~~~~~~~~~~
here is one recipe for getting a decal to lay down flat and stick.
 
1.  Use fresh decals.  After a year, or more, the film dries out and cracks and tears. 
 
2.  Apply over a good coat of paint. 
 
3.  While dry (before wetting)  cut the individual decals loose from the main sheet with a small pair of scissors.   Trim the decal closely, removing as much excess decal film as possible.  Trim all the corners round to prevent a loose corner from lifting up.
 
4.  Soak decals one by one in water, in a saucer.  The decal paper may curl, wait for it to flatten (after a few seconds),  lift decal and paper backing from the water. Carefully slide the decal off the backing paper and lay flat in the proper place.
* The decal adhesive is water  soluble. If you leave the decal in the water too long the adhesive washes away and then the decal won't stick.  *
 The decal film may want to stick to your finger and wrap itself up like a pretzel.  Don't let it, you will never get it straightened out again.  Steer the 
decal film to the proper place and get it square and centered.  A small paint brush or a needle or the point of a #11 Xacto knife all work to steer the decal.  Blot up excess water with a Kleenex.  Too much water and the decal will swim away from it's proper spot.  Let it dry long enough to stick in place. 
 
5.  Apply decal setting solution.  We carry Walther's Solvaset  & Microscale's - Micro Sol.  The setting solution is mostly formaldehyde which softens the decal film and lets it settle down around
 surface details- like rivets.  DO NOT attempt to move a decal after applying the setting solution, the decal softens 
so much that it will tear.  Let dry over night.
 
6.  After decals are good and dry, spray a coat of DullCote over it to make the decal film blend in. (Testor's DullCote). 
 
These tips are our opinions and they work for us. They may or may not work to your satisfaction.

Product Tip:


Here is Microscale's description for each product:
 
"Micro Set is a very versatile decal setting solution that does several things to the Microscale Decals to improve application. Micro Set should be applied to the surface of the model where you will be sliding off the decal. This prepares the surface with special wetting agents that cuts the oils in new paint and converts the adhesive on the back of the decal to a stronger and more lasting one. And finally, Micro Set slightly softens the decals film to make it more flexible so that it can conform better 
to the model's surface. Better adhesion by the decal to the model prevents tiny air bells from occurring and results in an invisible carrier film or the so called 'painted on look'. "
 
"Micro Sol setting solution is for the most difficult irregular surfaces you find on models. It completely softens the  Decal allowing it to drape down onto the surface of the model conforming perfectly and without distortion. You can get the most amazing results in seemingly impossible places, because Micro Sol actually makes the decal part of the paint. For that reason you should coat Micro Sol on for only a few seconds and then leave it alone, it does the work. Do not touch until dry as the decal is very soft at this stage and could be easily damaged. "

~~There are many different products to use with decals, these are the ones our guys like to use. If you have a different suggestion or something to add, we would love to hear it!
Valerie

Sabado, Oktubre 8, 2016

Model Kit Building And Painting Tips And Tricks


Our staff here at Chinook & Hobby West have noticed many of the same questions from our beginner level model builders. We have done some research and pooled our own knowledge to share some tips and tricks to help you along your hobby adventure.

Please leave a comment below and let us know your tips, ideas or if this article helped you.
Enjoy and Happy Hobbying!


Building a Model
  1. You need a designated space such as a large table with good lighting.
  2. Read through the instructions a couple of times before you start.
  3. Cut, don't snap off, individual parts from the plastic sprues.
  4. Compare the parts included, to the list of parts in the instructions.
  5. Smooth the edges of parts using a sanding stick or file to remove nubs and excess plastic resulting from manufacturing, then wash them in a mild detergent and allow to dry. Make sure to use gentle pressure when sanding so you don't take too much off.
  6. Collect your tools.
  7. Follow the parts assembly sequence exactly. Be patient and don't jump ahead.
Extra Tips
-Use the minimum amount of glue necessary to make a solid bond. 
-Enhance your assembled model by filling in gaps with putty and carefully sanding the filled surface.

Come down and see us at Chinook & Hobby West or email us if you have any questions.

Painting Your Model
  1. Do some research if you're building a replica. Every era has incorporated its own style. A replica of a Cadillac painted pink would not be an accurate model of the original car but may be your vision of your dream car.
  2. If you can, find a modeler's club and learn hands-on tips from more experienced modelers. There are some great online forums on the internet.
  3. Plan your paint scheme if you're doing your own design. Write down the colours you're thinking about so you don't forget that vision.
  4. Work on a clean surface.
  5. Clean your model. Use rubbing alcohol or plastic prep and let the model dry thoroughly. This helps to remove all oil and any other contamination, including excess glue.
  6. Put the model or model part on a paint stand or on a drop cloth.
  7. Shake the spray can thoroughly to mix paint properly.
  8. Test the nozzle by spraying a piece of cardboard, such as the inside lid of your model box.
  9. Plan on multiple thin coats rather than one thick coat.
  10. Start spraying to one side of the model, stroke over the model, and spray past the model before you stop.  Keeping the spray about 6 to 8 inches away from the project.
Extra Tips 
-Aerosol spray paints are good, but you may want to invest in an airbrush as you grow in the hobby.  
-Bright, shiny finishes can be achieved by painting the desired color, letting the model dry, spraying with a clear coat, and then finishing with a buffing compound. 
-Complete the detail work as necessary with fine-tipped artist brushes.
-Use thinners for your type of paint (acrylic thinner for acrylic paint) when brush painting.
-Paint in a ventilated area. 
-Wear a painter's mask if you are sensitive to smells. 
-Many experienced modelers suggest using primers when painting.

We hope that these tips and tricks help you create a piece you can be proud of.  Remember to have patience, take your time and if you get frustrated, walk away (after you clean up). You can always go back to it later!
Please leave a comment and remember, these ideas are not finite; there are so many things to try and experiment with.  Have FUN!


These tips are suggestions and we are not responsible for damage or accidents that occur to your project.


Huwebes, Setyembre 8, 2016

Model Tips for Beginners Part 1


Previously we did a Blog on  Basic Tips For Model Building for beginners that takes you step by step through some basic steps on building a model kit.  

The following are some questions that some of you, our customers, have asked either through email, social media or here at our store.  If we haven't answered your question, please send us an email or come down and see us here at Chinook & Hobby West!


How do I get the parts off the runners? 
It's best to remove the parts from the trees or sprue by cutting them off. Do this by cutting the part off as close as possible to the surface of the part so there is no excess plastic on the part from the tree. Most modelers use a hobby knife or sprue cutter (which you can find at most hobby shops). We do not recommend twisting the parts off because this can cause breakage, especially with thin or fragile parts.

Why do a few parts in my kit have rough edges?
Plastic injection molded model kit parts will sometimes have a rough edge or "mold line" on the part as a result of the manufacturing process. These can be removed by sanding the edge off the part with a small file, emery board, or sandpaper. Do this prior to painting your parts for a more realistic and professional appearance. Use a light touch as styrene plastic is soft and will easily sand.


I am a first-time model maker and am having difficulty removing the decals from the page to apply to model. Do you have any suggestions for application?
Decals should be dipped in lukewarm water for only a moment and then set on a paper towel to let the water soak in and dissolve the adhesive that holds the decal on the paper. The decal will curl up, and then unroll after a short time. At this point the decals should be able to be moved around on the backing paper and slid into location on the model. Once in place they can be dabbed with the tip of a paper towel or tissue to soak up excessive water.

We also would like to add that using a decal setting solution afterwards will help the decal 'snuggle' onto your project for your best look.


What type of glue or cement should I use?
Generally, most any glue or cement that is suitable for use on plastic can be used on your Revell model kit. Tube glues, such as Testors and Ambroid are the most commonly found and have a gel-like consistency. These are also made in a non-toxic formula to reduce some of the odors.
Use these sparingly in order to avoid the glue oozing out from the parts being joined. When using tube type glues you may want to squeeze out a small amount onto a scrap piece of paper or cardboard and apply a small amount to the kit part using a toothpick to control how much glue you are applying. Many builders like to use a liquid cement such as Testors, Tenax, or Pro-Weld, among others. Liquid cements can be applied using a small paint brush and can give you a nice, clean glue joint. Dip the brush in thinner from time to time to clean.
Other glue types frequently used are five minute epoxy, which is best used when you need a really strong bond for major structural parts of the kit, or "CA" glue, which is also commonly called super glue. CA is short for cyanoacrylate. Keep in mind that you do NOT want to use CA or super glues with clear or transparent parts as it will fog up the part.
Remember to always want to use any glue or cement in a well-ventilated area and to keep some nail polish remover nearby in case you glue your fingers together.

I accidentally got a finger print of paint or glue on my windshield. How can I get it off without ruining it?
If you only have a little bit of glue or paint on your glass, you may be able to get it off just by rubbing with a soft cloth. If you have any more, you may have to use more drastic measures like using a very fine rubbing compound ,such as white toothpaste. You can also use a superfine polishing kit. If you wind up with a slight fog on the glass, you can usually eliminate it by using model wax, clear enamel or liquid acrylic floor wax. If the glue is embedded too deeply, your only choice is to replace the glass.
Pro-Weld Liquid Glue

Testors Clear Parts Cement

Plastruct Liquid Glue

CA Glue, Debonder and Accelerator by Speed

Testors Model Cement and Liquid Glue


Watch for Part 2 next week:

  • Paint: Colors, Technique, and Troubleshooting
  • Decals: Types & Application
  • Customer Service/Replacement Parts


Thank you for checking out our Blog.  Please visit our Website, Facebook and Newsletters.

Source

Martes, Setyembre 6, 2016

4 Simple Tips to Flying Model Rockets


4 Tips to Flying Model Rockets

Building, designing and launching model rockets is a great hobby that the whole family can enjoy doing; there is rocket fun for every skill level. There are a few things to consider when you begin your journey into model rocketry. Take this information into mind when purchasing your rocket and rocket accessories.
1) Open Area - It is very important you launch your model rockets in open areas, away from homes, businesses and NOT around airports. It is recommended to use an open field, like a farm or soccer field. Make sure to ask for permission first.

2) Even Ground - Launch your rockets from a level platform and always straight up. If the launch pad is tilted just a few degrees your rocket could end up several hundred feet away. Flying your rocket at a 90 degree, perpendicular angle will offer the maximum height out of your rocket engines.

3) Skill Level - It is always a great idea to start small when you begin a new hobby. Try not to jump into a project that maybe to overwhelming at first. Pick from a ready to Fly, Easy to Assemble or a Skill Level 1 model rocket for your first build. This will teach you how the rocket works and how much time is required to build a rocket. Over time you can move your way up to higher skill levels as your knowledge grows.

4) Rocket Engine Size - Much like the skill level of a model rocket, it is a good idea to begin with smaller engines.Rocket engines come in a few different sizes, and most beginner rockets launch a smaller size. Once you have a few launches under your belt, then you can begin launching larger rockets, with larger rocket motors.


If you're in the Calgary area, check out the link below for more info and visit the calendar page for launches.
http://www.calgaryrocketry.org/


Thank you to Estes for this valuable information!

Please leave a comment below and share this with a friend!

Check out our Website: CLICK HERE
Like us on Facebook: CLICK HERE


Martes, Hulyo 26, 2016

10 Tips For Buying A Model Kit


Generally a model kit contains a scale model of an object or vehicle - automobile, aircraft, military vehicle, motor, building, replica figure, etc. (there are many to look at and choose from). Such kits include all the necessary pieces of the idea photo on the box (make sure to ask if you are unsure as some buildings show fences and trees, but these are sold separately or just a special part(s) of a larger model), which the hobbyist assembles and then personalizes with paints and decals (usually sold separately).
With model kits, there are two primary types of hobbyists: the builder and the collector. The builder fancies the challenge and the hands-on aspect. The collector, on the other hand, focuses on the possessing, and many collectors opt to display the kits untouched, in their original packaging.

Buying a Model Kit

For the new hobbyist, buying a model kit can be a daunting task simply due to the sheer amount of choice that’s available. Collectors have to choose a vehicle and the scale at which they want to work. Then, they have to factor in price, complexity, customization, tools and supplies, and so forth. If the desired model is no longer manufactured, then the hobbyist has to deal with a series of additional concerns, including appreciation. Choosing a kit is not simple, but even the new hobbyist can avoid the most common pitfalls by following these 10 tips:

1. Research Model Kit Types

The first step is awareness of the various types of kits that are available. The traditional model kit, often called Snap-Tite or Skill Level 1, is made of plastic and simply snaps together. Snap-Tite kits are very newbie-friendly and usually only require mild filing and light gluing to complete.  Experienced hobbyists will eventually graduate to Skill 2 requiring glue and paint and to any of the more advanced Skill 3-5 kits as well as die cast models and radio-controlled vehicles.


2. Choose a Vehicle Type

The next step is to choose the type or class of vehicle. The most popular model kit classes are classic, sports car, NASCAR, hot rod, truck, and service vehicles. Classic car models tend to focus on American muscle, but there are models available for the classics from all over the world. Skill 1 classics tend to be the most accessible kind of kits for the beginner. Hot rods are roadsters, typically open wheel, that have very distinctive aesthetics and engine mount configurations. Hot rods make great looking models, but they can be quite challenging in the building and customization stages. The most popular type of automotive model kit is the sports car model (Corvette, Austin Martin, Ferrari, etc), a class that focuses on street legal sports cars from all years and from all around the world. In the U.S., NASCAR models rival the sports car and classic car classes in overall popularity. The service vehicle class, which are intricate and challenging, includes vehicles like fire trucks, ambulances, snowplows, and so forth.
And just to add to the pile, don't forget Military vehicles, aircraft and ships.

3. Select an Interesting Subject

When choosing a particular model, collectors should opt for a subject that engages them. A Porsche 911 is very popular and a staple in most automotive model collections, but it can also be very boring due to that commonness. Rather than choosing a model based on what is already known, the collector should shop around until a model chooses them. Finding a model car that is aesthetically interesting, challenging to build but still suitable to the beginner, can be difficult, but such models are available.

4. Decide on Scale

The next step is to choose the scale of the model. The most common model size for a car is 1:25 (and manufacturers often use 1:24 rather than 1:25), which is approximately 6 to 7 inches long. In Europe, 1:18 is also very popular. The 1:18 kits are approximately 9 inches long. There are also 1:60 scale kits, which are approximately 3 inches long and are particularly well suited to the small hands of a young child. Small kits are also popular among collectors and builders who enjoy the miniaturization aspect, but tiny kits can require a great deal of patience and fine hand control.
We will discuss in a future blog about the different scales in military, ships and aircraft.

5. Evaluate the Complexity

After choosing the model and scale, consider the complexity of the kit. The first gauge of complexity is the number of pieces in the kit. A Skill 1 kit usually has less than 50 pieces. A Skill 2 kit can have up to 200 pieces. A Skill 3-5 kit can have 200-1500 or more pieces and include many fine parts.
Skill 1 kits are preferable for beginners, children, and adult builders who just want a relaxed experience. Most children can complete a Skill 1 kit with little supervision and only occasional help. Skill 2 or higher kits require additional skills, tools, and supplies. Be aware that choosing a complex model that the builder isn’t ready for can intimidate and overwhelm the builder and therefore loose interest in a very enjoyable hobby.

6. Consider Customization Options and Necessities

An often hidden aspect of model building is the optional, and sometimes necessary, customization and personalization of the model. Automotive model kits are often labeled 2-in-1, 3-in-1, and so on; what that means is that the build process has a branch that allows for multiple finishes. For instance, many classic car kits come in a 3-in-1 configuration, which means that the collector can build it as a stock car, custom car, or race car. Many hobbyists opt to build these kits in all variants and display them alongside each other. First-time builders, however, should consider a basic kit that has no variants for simplicity.

7. Consider the Needed Tools and Supplies

Another important consideration is tools and supplies. The beginner will require basic hobby tools, such as a hobby knife, tweezers, paint, a fine file, and modeling glue/cement. Skill 2 and higher kits, however, will require a range of hobby knives and files as well as putty, sanding paper, spur cutters and perhaps a rotary tool or other power tools. Diecast models require metalworking tools, and radio-controlled models require batteries, an electronic motor, controller, and so forth.

8. Opt for a New Automotive Model Kit

Manufacturers produce kits in runs, which are typically time-limited. Once a run ends, the kit then becomes vintage and begins to appreciate in value. Vintage model cars sell at many times their original sticker price. For the builder, the most common reason to buy vintage is to get a particular classic car, which tend to go in and out of production. Although this will limit the hobbyist’s options, the beginner should focus on new kits in order to work with modern materials and avoid the vintage premium. (many kits are done in a re-release at milestone marks such as the 10th, 25th or 50th year anniversary of that kit or the car/piece)


9. When Buying Vintage, Price It and Haggle for It

If the collector opts to purchase a vintage model, then they should price it first. Price guides will provide a general appraisal, and the Internet is a powerful resource to determine the actual going rate. When buying a vintage model, shop around; check online, local shops, garage sales and shows/conventions. Once found, don’t settle for the listed price, which is generally a best-case scenario for the vendor.
(Be realistic in your negotiations you don't want to insult the one selling the kit in case you want to buy from them again)

10. New Builders Should Have a Contingency Plan

New builders should have a contingency plan because first builds usually do not go according to plan. A benefit of buying a current kit is that the collector can easily purchase an additional kit from the store or replacement parts directly from the manufacturer. Some vendors sell open box kits, which may be missing parts but are a cost-effective way to have spare parts on hand.


Conclusion

Buying a model kit for the first time can be difficult due to the sheer amount of choice available. A hobbyist’s first step should be to educate himself or herself on the various options that are available: classes, models, scales, books and other sources. Next, the beginner should choose a subject that interests them, but also one that isn’t so complex that makes it difficult to learn. With the first build under one's belt, the builder will be able to graduate to one of the more intricate kits the next time, and go into dioramas - but that's another blog......

What did you think of this article?  Please email us or comment on this post and let us know your thoughts and questions.


partial source 

Lunes, Hulyo 11, 2016

Tips for Painting and intalling a canopy on your model aircraft


Have you ever felt frustrated trying to put a conopy on your aircraft?  Did it cloud up or the paint wasn't looking great on the canopy accent?
     I know how you feel! When little mistakes happen it tends to kill any creative inkling you may have felt.
It's daunting enough creating your favourite aircraft – never mind putting together a piece you can be proud to show off.
     Here's some helpful tips to help create a model to be proud of; without fancy terms, and keeping it simple.

 When you've finished this post, you'll know exactly how to create a great canopy for your next model plane.
Please make sure to comment on this blog post with your thoughts and don't forget to sign up to our Newsletter to keep up on new product, contests, sales and more!

Let's have some fun!

-Two kinds of successful mask. Liquid and tape


     Before starting, make sure you have all your supplies together. Your mask tape, hobby knife with a sharp blade (#11 works best), proper cutting surface, good lighting, hobby paint for your project and Clear parts glue

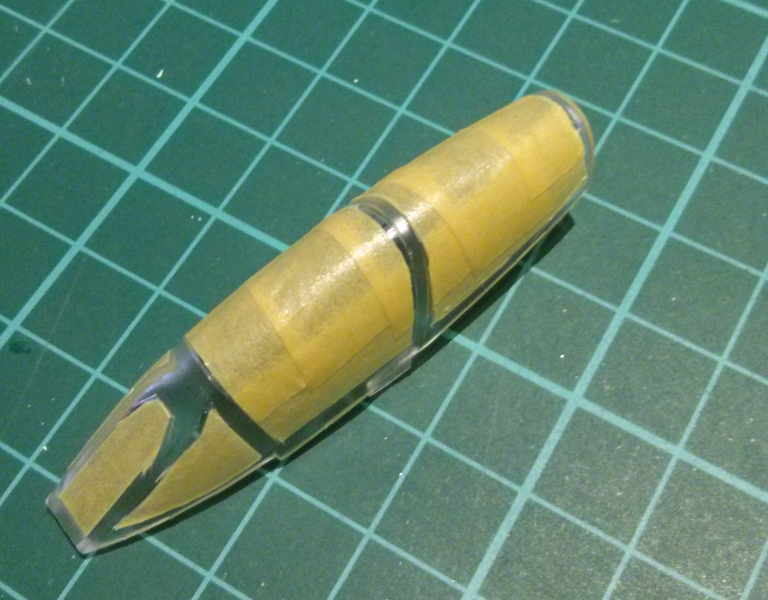
MASKING THE CANOPY FOR PAINTING
1)  make sure that all the clear airplane model parts are clean, dry and free of any fingerprints or dust. And your hands are clean and dry.
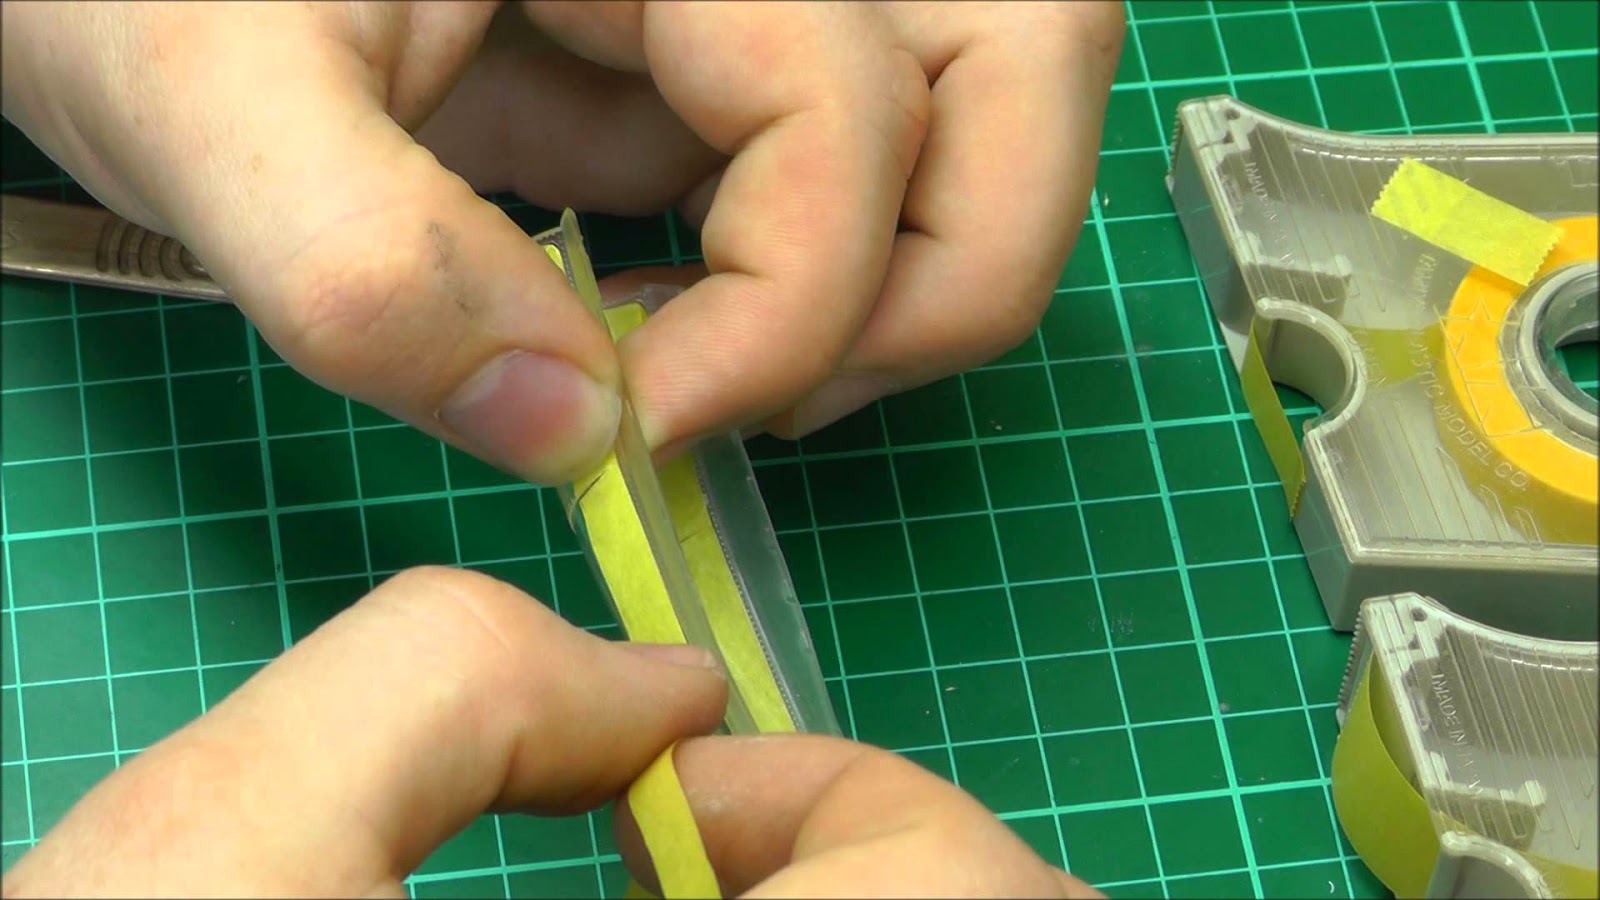
2)  Start with the 6mm Tamiya masking tape. Tear off a 4' piece and starting at the rear flat edge, carefully run the tape along the bottom outline of the
canopy.  Gently press into place.
 a short video with more tips for Masking Your Canopy


3)  Using the 6mm tape, mask alongside any raised parts (so you don't cover the part you want to paint)
4)  Bring the tape smoothly to the end of the edge and cut off excess.
Tip:  Make sure to cut past the end of your piece of canopy or you may cut into or scratch, your conaopy

5)  Either continue to mask areas you don't wish to paint with the 6mm or fill in with the wider tape such as the 18mm.
6)  Take your time when masking - it's a learning process.

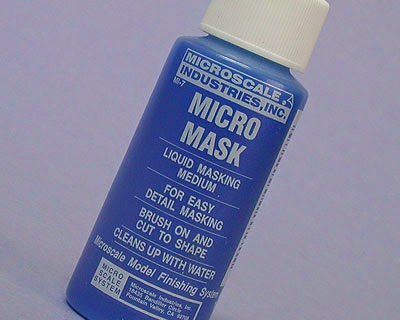
Tip: If you choose to use liquid mask, just use a fine brush to paint on the liquid mask and let it set before you paint your model (follow the directions on the
bottle).  Peel off mask after you've let the paint dry, scoring the mask along the paint line for clean edges.

TIP: It's really important to take your time, use a very sharp hobby knife and cut a clean, precise section, free of tearing. Any raised details you intend to paint,
should be the only areas visible through the mask.


PAINTING YOUR CANOPY:
     Now it's time to paint the canopy of your model aircraft.
1)  Airbrush or handpaint your first coat using the interior cockpit colour and allow some time for it to dry.
2)  paint the fuselage colour over it and allow it to dry.  Or finish the canopy of the aircraft by applying your preferred paint colours
3) finish with a final coat to seal the paint (dull, gloss, etc.) over the canopy before you remove the mask.
 4)  After all paint has dried, use your hobby knife and carefully run it along the edge of your mask and gently lift off the mask with the tip of the blade and slowly peel off the mask.

Enjoy your work!

Tip: don't use dullcote or gloss cote directly on clear areas, if you wish that part to move on your model. Spray the model and clear part separately, then attach the clear part.  Don't spray any unmasked clear parts as dullcote can cause the part to fog, so keep the mask on and spray the painted areas.

Now you're ready to glue on your canopy

USING CANOPY GLUE (clear parts glue)
- This is a glue that dries clear and doesn't cloud your clear parts

  Now your canopy is ready to install. I like to use Testors Clear Parts Glue to glue it in place. This glue goes on white but then dries clear. It's best to put a small puddle on a scrap piece of cardboard and use a tooth pick to draw a fine line of glue around the perimeter of the Canopy.


Now place it in position and use folded piece of Kleenex or paper towel to hold it in place and avoid fingerprints. Once the glue has dried, apply the rest of the glue and guide it into position if needed.

 Tip: The Testors Clear Parts glue cleans up with water before it dries so you can wipe small smudges off with a damp cloth.


```Extra Tip:  using Future floor finish. This technique will make the clear plastic appear thinner and clearer. Surprisingly, it can also hide minor scratches and blemishes that are often unavoidable when working with clear model kit parts.
      Check out how:

Now it's your turn!  Please leave a comment on what you thought of this blog post.  We would also love to see your work or works in progress!  Please email us with your photos Today!

Miyerkules, Mayo 11, 2016

Storing SuperGlue CA glue helpful tips


Super glue also known as CA glue or cyanoacrylate adhesive can be as helpful as hard to work with. I imagine your 'huh' expression.
It is great for bonding all kinds of different materials together, especially skin to skin. I like to use it when building model kits, but if you don't test it first it can melt some plastics.  Its great for ceramics, some denser wood, some metals and many other items.  I would not recommend it for repairing high impact plastics such as dashboards in the car or the frames of glasses as it can cloud the lenses.

Here are a few tips:

-Cut the tip of the glue bottle neck at an angle, this prevents clogging and gives you a guide to help control application.
-Store your CA glue in the door of your fridge (just make sure you keep in in the original safety bottle to prevent children from getting it). This will extend the life of your super glue up to six months.-Remember a little goes a long way, using a toothpick to apply to small areas will minimize oozing.
- Never use Superglue on clear parts, it could cloud them.
-If you happen to glue your skin you can use nail polish remover or Debonder (we have the brand "Speed" and "Speed Reverse").

Tell us your helpful hint.....

Miyerkules, Abril 27, 2016

Biyernes, Abril 1, 2016

Model Tips for Beginners Part 2


Previously we did a Blog on  Basic Tips For Model Building for beginners that takes you step by step through some basic steps on building a model kit.  

The following are some questions that some of you, our customers, have asked either through email, social media or here at our store.  If we haven't answered your question, please send us an email or come down and see us here at Chinook & Hobby West!

Make sure to check out Part 1 from last week:
  • Removing parts from frames (also known as runners or sprues)
  • Removing Decals for beginners
  • What type of glue or cement should I use?

---------------------------------------------------------------------------


What type of paint is best to use?
There are dozens of different paints sold in hobby and craft stores, hardware stores, and chain stores. We generally suggest that you try to stay with paint made specifically for plastic models. Most hobby paints will be either:
  • Enamel, which you will need to use paint thinner or turpentine to clean your brushes and equipment, or
  • Acrylic, which is water based so water will clean brushes and equipment.
You must clean the unpainted plastic parts prior to painting because paint may not adhere to the parts otherwise. This will remove the oily mold release spray that is added during manufacturing. To clean, put a few drops of a liquid dish or hand soap on an old toothbrush and give the parts a quick scrubbing. Let the parts air dry.
Many modelers like to use spray paints for the largest parts of their model, such as car bodies or aircraft fuselages because sprays will provide a better finish. Usually smaller detail parts are painted with a brush using bottled paints.
Some general guidelines when using sprays are:
  • Use a coat of primer before spraying on your paint. Some paints may "craze" or attack the plastic surface depending on the paint's ingredients.
  • Don't attempt to cover the part with one coat of paint. You want to spray several very light coats to build up the coverage. Paint coats that are too heavy cause runs and loss of engraved detail. Follow the directions on the can, but generally you'll want to wait 15-20 minutes between paint coats.
  • It's best to stick with the same manufacturer for the different types of paints you use on the same model (primer, color and clear, if you use a clear coat). Putting one manufacturer's paints over another may cause them to react with each other.
  • Let the paint dry completely before handling or trying to polish out the paint. Although it may seem dry on the surface, a good way to tell if the paint is fully cured is to hold the model up to your nose, if you can still smell the paint, it's probably not dry yet.
Why can't I find colors like fiery yellows and leafy greens in paints?
There are a variety of manufacturers that make an almost universal variety of paint colors that are compatible with plastic models. Testors, Tamiya, Humbrol, Floquil and Badger are just some of the companies you may want to check out. Rust-O-Leum is also safe because it is fish oil based, but always test first to be sure.
Don't be afraid to look in military, automotive, marine or any other category for paint. It's the color that counts, not the name on the bottle.
How can I fix a mistake in my paint job?
Your model should be quite salvageable. First thing, do NOT use sandpaper. There are a number of products that will remove most paints from styrene plastic safely. We recommend using products made specifically for this purpose, such as Scale Coat or Easy Lift Off by Floquil. Once you have stripped the paint from your model, wash and dry it thoroughly and re-prime. You should be good to go!

Why do I sometimes get bubbles in my paint?
There are a number of possibilities that could cause bubbles in your paint, but one of the most common is residual mold release left from the manufacturing process. Before painting any model, wash it with dish soap and dry thoroughly. Be sure to prime your model before painting so any imperfections may be resolved before applying your finish coat.
Is it better to paint the model before or after it's built?
Generally, you will have better results by painting your model before assembling it. An exception is to first glue together small parts of an assembly if they will all be the same color and painting it as a unit.


Decals: Types & Application

How do I apply decals?
Revell SnapTite® (Skill Level 1) kits contain "Peel 'n Stick" self-adhesive decals that are applied by simply peeling the image from the paper backing and applying to the model. Kits that require glue (Skill Levels 2 & 3) have traditional waterslide decals.
To apply a waterslide decal:
  • Cut apart the individual images from the sheet.
  • Dip the decal into lukewarm water for 1 or 2 minutes. Take the decal from the water and see if the image will move or slide on the paper backing. If not, return to the water for a few more seconds.
  • Once the decal will slide on the backing, put the decal and backing on a paper towel for a few seconds to remove the excess water.
  • Then bring the decal up to where on the model you want to apply it and slide the image from the paper backing onto the model. While wet, you can still move the image on the model a bit to position it just where you want it. If there are any air bubbles under the decal, gently push the bubble toward one of the edges of the decal with a wet Q-tip or edge of a paper towel to remove it.
  • When the decal is in position, simply leave it air dry and it will stay in place.
Many hobby shops will sell various decal setting solutions that will help the decal conform to sharply curved surfaces. We suggest trying out the specific solution you wish to use on an unused decal from the same sheet applied to a piece of scrap plastic to make sure the solution will not react with the decal. If you wish to spray a clear coat over your decals, the clear paint you intend on using should be tested first using the same method.


I am a first-time model maker and am having difficulty removing the decals from the page to apply to model. Do you have any suggestions for application?
Decals should be dipped in lukewarm water for only a moment and then set on a paper towel to let the water soak in and dissolve the adhesive that holds the decal on the paper. The decal will curl up, and then unroll after a short time. At this point the decals should be able to be moved around on the backing paper and slid into location on the model. Once in place they can be dabbed with the tip of a paper towel or tissue to soak up excessive water.

My model requires that I put the gas cap on before the decals. How are you supposed to fit the decals over the gas cap?
The best way to do it would be to apply the decals first, and then with a sharp hobby knife make an "X" pattern hole in the decal and then install the gas cap.
For a tutorial on putting on very small decals Click Here


Replacement Parts

I bought a very old kit from a garage sale, at a swap meet, or on Ebay. Do you still have parts and decals for it?
Although we do our best to fulfill requests for missing parts, many of the kits available through collectors or other independent sources were released many decades ago. These kits can make wonderful collector's items, but it is unlikely that we will still have parts for them.
If this is the case, you might want to contact another collector through an online forum. Collectors will sometimes seek out multiple copies of the same kit so they can combine them and have one complete kit with some extra parts. You may be able to arrange a swap or purchase that way.
We usually suggest that you try going directly to the manufacturer of the model kit.


Why do models sometimes look different on the box than what's in the kit?
Although manufacturers try to make sure that the box art represents the actual model kit, in some instances there may be small variations in what is shown. Sometimes, the hand-made master model is used for the box art photo because the actual kit production hasn't been completed. Or, the producer of the actual prototype may make changes after the model tooling is committed for production. In either case, the differences will be subtle and will not affect the overall model kit subject.

--------------------------------------------------------------------------------------------------------------------------------------------------------------

We hope that we have been able to answer some of your questions.  Please let us know what you think of our blogs. We love to hear from you.


Thank you for checking out our Blog.  Please visit our Website, Facebook and Newsletters.

Source

Linggo, Marso 27, 2016

Tips For Scenery On Your Layout or Diorama


     Have you ever wondered how modellers of dioramas and railroad layouts get nice clean, carved lakes, water bodies and cool mountain scenery?  How its done without the heavy hassle of wood and plaster?
    
     The trick is to making your project lighter, easier and more fun to work with is the Insulating Styrofoam. You know the dense stuff that comes in Pink or Blue. Its easy to get from home improvement stores or somewhere that sells construction supplies. The foam usually comes in 4' x 8' sheets and doesn't flake away or create a huge mess like the pellet white Styrofoam can.

     Using a knife, hot wire foam cutter or other creative tools you can carve into it, cut it, and paint it (with acrylics). To create water bodies outline the area with a pencil line gently pressed into the foam (you can change or adjust it as needed). When you have the area lined out, carve it out with varying depths for realism. Make sure you seal the bottom with an acrylic sealer or a layer or two of white glue.

     The pink Styrofoam is very rigid and I have found it's also very easy to stack to make very realistic looking mountains, just stack, glue and carve. You can add small areas of hydrocal rock faces for extra effect and little added weight.

     So, the next time your stuck in a construction related traffic jam, don't get to frustrated you can spend the time looking around for bits of discarded foam and thinking of that new idea to add that extra fantastic look to your next project.

~ submitted by Jesse Millington


(This article is by one of our staff. He has had experience with model building, model railroading and collecting. This article is his opinion. There are many different ways to make and design water and if you have any tips you would like to share or an article you think our readers would enjoy, we invite you to share it in the comments on this blog, on our Facebook (www.facebook.com/ChinookAndHobbyWest) or on our website (www.chinookandhobbywest.com). Thank you for following our blog Chinook Hobby Talk.)

Lunes, Marso 14, 2016

Tips on Removing Action Figure Heads Limbs


A short dip in boiling water and the head will soften and pop right off. Repeat the process to put it on another neck. The head will harden back up." -- Don Thompson

"On the question of hard heads, a hair dryer also will work and doesn't get the figure wet." -- bcsnaare@pinn.net

Here's how to take off the head of an action man snow board raider (IAM). Simply grab the head and pull upward until it comes off. Putting another head on works the same way, only you push. Sometimes, if the head is hard, warming it with a hair dryer makes it soft and easier to put on/take off. I have done this four or five times and never damaged anything. Don't worry about the little pin. -- Bob S.

 I have used the unorthodox method of heating hard heads in the microwave starting at about 10 seconds on high and increasing the time in 2-3 second increments on stubborn heads. You do have to be careful or you will melt them. -- RRG-Zach-La

If you want to trade the heads with someone, do it with the posts. It is easy to change the post. Simply lift it up and slip a small screw driver or ice pick into the elastic hole to hold it in place, then just slip the post off the hook. If you insist on taking the head off the post, then use some warm (hot) water to soften the head. -- Matthew

For more of this article CLICK HERE
GI Joe® is a trademark of Hasbro, Inc.

Huwebes, Setyembre 10, 2015

Tips On Gluing Clear Parts


Many of us have done a model where we are following the instructions- only to find out the glue we used to put our masterpiece model together has clouded up our canopy, windows or other clear parts. After you stop cursing and yelling and pick up your model and its bits off the floor, you wonder what happened and can I fix it?

Ah, well - the what happened is easy. The fumes from the glue have reacted to the plastic and you can't fix it. You could alter the clouded plastic part and make it look like the window smashed, or  if its a car you could do a diorama with teens making out in the car (steamed windows - good imagination helps).

To prevent this in the future? You need to use a clear parts glue. At Chinook & Hobby West we have two different kinds: Testors Clear Parts Cement and Cheap Stick Hobby Glue.


Use fine beads of clear parts glue to secure the piece in place. Hold it in place for about 1 minute to set enough to let go of it. Then leave it overnight to cure. It dries clear. If you need to remove excess glue use a fine file so you don't mare your clear part and can control where you are filing.

Come down to our stores, call us or email us if you have any other questions.

Ph North - 403-984-3438                     Ph South - 403-243-1997
email    hobbywest@gmail.com                email    hobbywest@shaw.ca

Check out our website Ezine page for more tips, info and ideas!
http://www.chinookandhobbywest.com/chinook-breeze-ezine.html

Lunes, Mayo 25, 2015

Modelling Diorama tips


It seems that there are an increasing number of people wanting to get into modelling (model kit and diorama building) these days. Most of these are people that built kits years ago and some are first-timers. Their skills may be rusty or non-existent. We would like to assist you with helpful suggestions on building, painting and detailing.

  Many models, even cars, can be put into a simple diorama setting adding a new dimension to your modelling skills by adding a story. For example, you just finished a car model and you put it on your shelf. Nice. Now picture it sitting on a piece of thin wood painted in a tarmac or concrete colour, paint in 2 yellow lines and you have a parking lot. This sets the car off nicely, and it was simple to do.

You could just as easily make a roadway base. Add some Woodland Scenics dirt and grass and you have a country road.

This idea of putting your models into scenes is where modelling and trains (building model railway layouts) meet. Both use the same materials and skills. A model train layout is basically just a big diorama, just a little more work & imagination.

    As a hobby shop host for our guests, it is not only our responsibility to provide the materials the modeller needs but to provide the knowledge on how to create the effect they are looking for. There are the basic techniques and materials that are commercially available but we have found over the years that many modellers have found other ways to create using different ideas, many of which have nothing to do with traditional modelling.

   We invite any modeller that has different ideas and/or techniques to share this with other modellers by emailing your idea or YouTube video so we can post it with your name (if you wish). We also invite train modellers to share what the have discovered over the years. The more knowledge you have, the more enjoyable modelling is.

~~This post is by Al B. at our South store. He has been doing various model and diorama builds for over 30 years. This blog is his opinion on how he views modelling.