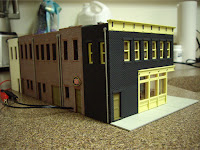
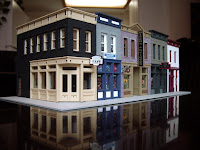
The weather this September was even nicer then it was in July and August, and to be honest, it was difficult to stay indoors to do any work on my layout, especially in the basement which has not even one window. Even with the beautiful weather, I still managed to find some time to finally tackle and complete my Walther’s Merchants Row I kit.

I received this kit as a Christmas gift last year from a friend, and finally pulled it out of the box about 2 months ago. I started by constructing the basic shell; the 4 walls and 2 doors, leaving the roof and window glazing off to more easily paint the walls. I finalized my paint schemes before I started painting, comparing colours on paper to ensure they didn’t clash with each other. I then started painting; small section by small section.
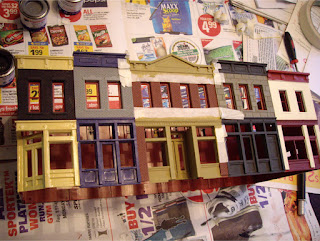
This structure has lots of detailed sections and components, all on one common piece of styrene. I found (at least for myself) that you need two basic skills to successfully paint this: patience and masking tape. After painting each section, I made sure it was completely dry before painting the next. This ensured that overlapping colours did not bleed together, and that I didn’t accidently put my fingers in wet paint while painting a different section. Masking tape was also essential for straight, crisp lines. I don’t have a very steady hand, so painting a straight edge freehand is almost impossible for me.


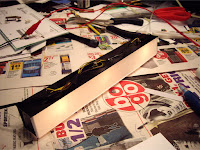
I used a hobby knife to cut small pieces of masking tape for almost all straight edges, using a small flat jeweler’s screwdriver to push the masking tape hard to reach areas. This came in especially handy when painting the window frames (as seen above). The extra time it took to mask and allow the paint to dry really made the difference in the end, not to mention how it made up for the shortfalls in my free-hand painting skills.

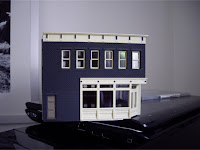
Once the basic structure was painted, I used a white wash on the red brick sections to highlight the bricks, then sprayed the entire model with Testors Dull Coat. I then used clear styrene for the window glazing. For the blinds, I used Google image search to find several different types of blinds, then shrunk them down in Adobe Photo Shop to the sizes I needed. I then printed the blinds out on a colour printer, and cut them out as needed. I then glued them to the back of the clear styrene windows.

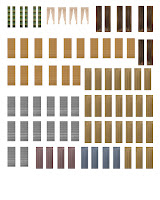
CLICK THE IMAGE ABOVE FOR A HIGH RESOLUTION VERSION OF THE BLIND TEMPLATE THAT YOU CAN PRINT AND USE FOR YOUR OWN WINDOWS
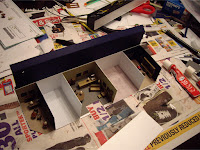
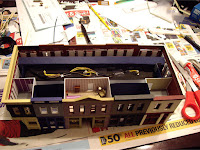
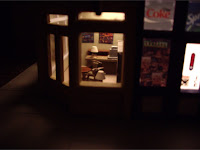
I wanted do a couple interior scenes just for fun, as well as add some interior lighting. I was posed with 2 issues however. The first was that I did not want to light every window in the structure, and second was that I needed to divide up the interior, as the kit has so many windows that it looked unrealistic when you looked in a window at one end and could see all the way through to the other end!

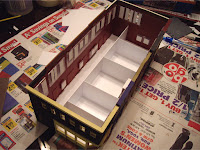
To divide the structure into interior rooms, I first cut a base from a bulk sheet of styrene which fit perfectly inside the structure to act as the floor. I then made interior walls with styrene, gluing them to the base. I made sure that the building’s shell slid easily over this interior “unit”, ensuring that the interior walls didn’t rub against the exterior shell. I built the interior as a removable insert so I could more easily work on the interior scenes and lighting, both now and in the future.
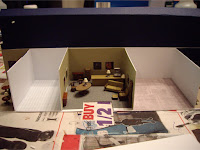
I used cardstock from a craft store for the flooring and walls, mimicking carpet and wood flooring, and painted and wallpapered walls. I put a large piece of cardstock towards the back of the interior unit, reaching all the way up to the roof, blocking out all light from reaching the rear windows of the building. For the second floor, I built individual small rooms from a combination of styrene and card stock which I then glued directly to the inside of the outer shell. For the rooms I wanted lit, I simply cut a small doorway opening to allow light in, and for the ones I wanted dark, I just left them sealed.

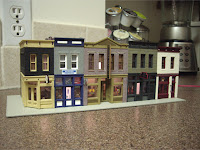
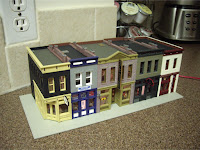
The interior scenes are furnished mostly with painted accessories from a Model Power interior accessories kit. I printed small photographs and paintings I found online on a colour printer then cut them out and glued them to the walls to represent full sized artwork. For the grocery and clothing storefronts, I built small photo holders from styrene, and glued these behind the windows. I then took images of real storefronts, re-sized them, and printed on a colour printer. I then cut them out and inserted them into these small holders behind the window glazing. I now have storefronts that look like they have real window displays. You can read full instructions on this method in this month’s Model Railroader magazine (October, 2011).

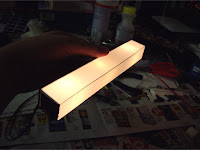
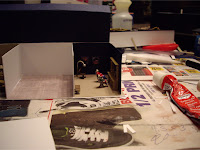
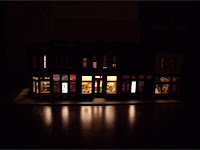
Lighting the unit is achieved by a light box that I built out of styrene. It is lit with 3 small 12 volt incandescent bulbs, and is painted black on the top, back, and sides so light only glows from the front and bottom. The box sits snugly in a slot I left in the building above the main floor walls and behind the second floor rooms. Light from the bottom of the light box lights all of the main level consistently, while the light glowing from the front of the light box lights the top level rooms through the small doorways. I opted to use a light box as the styrene diffuses the light evenly and reduces harsh shadows. The incandescent bulbs are preferred over LED’s as they have a warm, yellow glow (which is difficult to replicate with LED’s), even though incandescent bulbs are not as efficient and give off lots of heat.


I finished the model with dry transfer decals from Woodland Scenics; transferred directly to the window gazing as well as signs included with the Merchant’s row kit. The “Mitch’s Antiques” and “T&B Clothing” signs, as well as the coke product logos were all printed on photo paper, then cut and glued to the structure/signs. The final product turned out pretty good, or at least as good as I wanted it to. I took my time on this one, and I think it paid off!

I’ve now started working on a Walther’s White Tower kit, which I plan on building as a bank (possibly). The cold, fall weather is definitely here, and summer is officially gone. Time to start working again in my basement on my actual layout!


0 (mga) komento:
Mag-post ng isang Komento