Linggo, Agosto 31, 2014

Chapter Ho iron horse express train set


Ho iron horse express train set

Here a Pictures Ho iron horse express train set HO Iron Horse Express Train Set

Ho iron horse express train set

14751 ho scale athearn streamliner train set-prr, Ho scale, f-unit locomotive, observation car, coach car, vista dome car, trainpak power supply, grey roadbed, nickel silver, e-z track, 45" x 36" oval, fully. Ho scale train sets modeltrainstuff.com, Ho scale train sets from popular manufacturers including atlas, athearn and bachmann. we have sets ranging from early steam locomotives to modern diesel and electric. Ho scale electric starter sets - lionel train sets, Model trains train sets toy trains trainworld general disclaimer. prices are subject to change without notice. prices in stores may vary..
Ho products: athearn trains, Flexible bus company. flxible clipper bus. firetrucks.
Electric train sets : bachmann trains online store, Bachmann trains online store : electric train sets - catalogs large scale ho scale all scales n scale o scale on30 scale williams 3 rail o scale product lines.
Train sets modeltrainstuff.com, Shop our online selection of train sets from your favorite manufacturers including lionel, mth, bachmann, athearn and many more..

Pleasing the Crowd or Yourself That is the Question


As I go about the messy business of rebuilding a major portion of my model railroad, I'm beginning to struggle with the question of just exactly what I'd like my layout to be. The original design is a wonderful tangle of main line, yard, branch line and industrial operations. And even in its present confused state, it serves well the social interaction that model railroad operations can be.

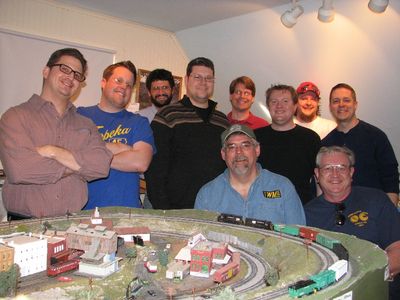
At any given session, I can have 4 to 10 crew jammed into my layout room, and everyone (for the most part) has a job to do. In fact, without that formidable staff, sometimes it's difficult to justify even turning on the lights in there. I do go in and tinker, and will on occasion set the turnouts for a closed route and enjoy watching a train circulate. But I'm trying to come to terms with the idea of having all this stuff, and questioning whether I'm really enjoying the layout the way I want to.

My operations plan is, admittedly, heavily influenced by the fact that I live at least a couple of hours from most of my crew. They travel a good distance to run my layout, so I feel compelled to provide them with a solid "play value" for the time they have invested. Thus I have staging areas that can hold hundreds of cars, lots of money tied up in switch motors, DCC throttles, and let's not even get started on rolling stock. In between sessions, I'm faced with building the new this, or rewiring the faulty that... and of course, cleaning engine wheels.

Now don't get me wrong, I like running those hot freights from one staging track to another. I love sorting cars and assembling trains in the yard, then sending them on their way. I really like switching my big industries, and that drag of empty hoppers needs to get back to the tipples...

But am I biting off more than I really want to chew? It would probably help if one or two guys lived closer, and could come over on a Tuesday night to help take care of the tedium. Or if I was an hour away, instead of two plus, so I could expect to fire up the layout more than three or four times a year. Right now, it seems a to be a lot of buck for the bang.

So, what to do? Do I go ahead and blast the whole shootin' match and start fresh on a simple short line that I can get my head around? Do I revisit the master plan, and see if it can be made to work with fewer hands (and dollars?)

My fear is that by scaling back to a railroad that looks, fits and runs better for one guy in a relatively small space, that I'd be sacrificing the opportunity to have those great ops sessions where guys come from far and wide to have a good time at my house. (A bit narcissistic, but then aren't we all?)

I'd also miss the variety of operations that I enjoy. While I think I'd love to build a simple branch line serving a handful of customers with a heavily weathered geep, I might also get terribly bored with it after a few times of doing the same thing over and over and over...

I suppose the only real answer is to press on with the master plan, and when the urge hits to run that rusty switcher, I'll just turn on the branch line and let the rest of the layout sleep...

Sabado, Agosto 30, 2014

End of August update You Tube video


Here's an update video on my progress on the layout this summer:


Introduction Why Rymal Station


Hello All!

This is the first post in my new blog so I’d like to introduce myself and the aim of this blog. My name is Peter and I have been interested in trains as long as I can remember. Part of that interest, a large part in fact, includes model railroading. My interest is in modern-day CN and CP operations, with some shortline modeling as well (GEXR, OSR). I have been reading several other model railroad blogs for some time now and it has inspired me to start my own. Hence, the idea of this blog is to document the progress on my home layout, as well as some prototype photos as well. 

I say ‘my’ home layout, but in fact it was started by my dad about 20 years ago. He designed most of the track plan, and completed the benchwork and the majority of the track work. My brother Mark and I are now working with dad to complete the trackwork and at the same time convert the layout to DCC. I’ll post more info and a track plan later, but hopefully this brings you up to speed with where I’ll start this blog. I hope in the foreseeable future to get the trackwork running reliably and start adding some scenery to the layout.

Why Rymal station?

Well, the short answer is that I had to call this blog something. The long answer is that it seems many modelers name their layout or blog after something meaningful to them or their modeling. Rymal was a small hamlet on the south edge of Hamilton, ON, and bears the name of William Rymal, an early settler of the area; it has long since been amalgamated with the city of Hamilton. Rymal, sometimes referred to as Dartnall or Hannon, was important enough to warrant a station on the CNR line from Hamilton to Jarvis (originally Hamilton & Lake Erie; I’ll post more info on the station itself later). This was the line made famous for its’ street running down the middle of Ferguson Ave in Hamilton, and later the use of an A-B-A set of F7’s on the Hamilton-Nanticoke steel train; again, more info to be posted on the steel train later on. My house is located about four miles from where the station stood, and my dad grew up less than a mile from the station’s location (though it was demolished about three years before he was born). And at one time many years ago, my great-grandfather ran the Rymal feed mill (actually named Ancaster feed mill for reasons long lost to history), and would bring in boxcars of grain to the siding at Rymal for use as animal feed. So not only was it geographically the closest rail point of interest, but in some strange way it seems to make sense.

I’ll try to update this blog as often as time permits, but until then, thanks for stopping by!

Cheers,

Peter.

Tips Chattanooga train set ho gauge


Popular Chattanooga train set ho gauge

Ho train set ebay, Find great deals on ebay for ho train set and lionel train set. shop with confidence.. Electric train set ebay, Find great deals on ebay for electric train set and lionel electric train set. shop with confidence.. Ho scale electric starter sets - lionel train sets, Model trains train sets toy trains trainworld general disclaimer. prices are subject to change without notice. prices in stores may vary..
Depot ho scale trains, ho train sets inventory (216) 252, Depot ho scale trains, ho train sets inventory generated 8/27/2015 all items subject to prior sale. home page/index accurate lighting (acl) accurail inc (acr.
Model train sets - electric and battery operated train, Train sets we stock a tremendous selection of train sets from athearn, atlas, bachmann, kato, lionel, lgb, roundhouse, and walthers in al..
Best train sets of 2017 - our favorite model trains (kids, Train set: bring joy to your home with a model train set. whether you are a model enthusiast who loves to build train sets or a parent looking to put together.
There are six reasons why you must know Chattanooga train set ho gauge Find here about Chattanooga train set ho gauge and your search ends here Before going further I found the following information was related to Chattanooga train set ho gauge check this article

illustration Chattanooga train set ho gauge


BACHMANN THOMAS & CLARABEL TRAIN SET 642 HOGauge DVWP eBay

Biyernes, Agosto 29, 2014

Erie Radio Rules 1952


I'm very excited to have acquired a copy of the January 24, 1952 revision of the Rules and Instructions for Main Line Radiotelephone Communication for the Erie Railroad Company. It is printed, well actually typed, on a set of stapled 8-1/2x11 paper that was thumb-tacked in the top corners and middle bottom at some point. I can imagine it was in a tower or office on a bulletin board where it was never referenced because there is only one tack hole in each location. I also bet it was hung very straight since it has that bottom tack - which rendered it unusable while on the bulletin board. It is also folded into quarters - maybe it was mailed to the office since there is not enough wear for it to have been stuffed in a pocket in field use. Six pages in all numbered 1-5 with a cover page bearing title and Erie herald.


The content is, as you already can imagine, priceless. After the obligatory general conditions that describe what radio equipment is and how it should be treated, there is a very specific set of OPERATING RULES on how to use the equipment, what are appropriate conversations, how to call an emergency, etc. The meat for me kicks in with the examples of radio protocol including how to identify one's locomotive.

No. 8 in the rule list states,

8. In making calls, employees will sufficiently identify the station from which they are calling and the station they desire to communicate with, for example

"BQ calling Caboose Train NY 98"
"Erie Diesel Train 99 calling Caboose 234"
"Walkie-Talkie Train 100 calling Diesel"

When identifying Diesels by number[,] the unit letter, if any, should be given also; for example, "Diesel 707-A", or, "707-D". Multi-unit diesels are frequently operated in two independent sections and there is a possibility of confusion if "Diesel 707" only is used.

How great is that? This establishes radio protocol for the layout in a few sentences and adds to the flavor of the railroad tremendously. While this is similar to procedures employed on other layouts I operate on, it is different enough that people will be in a different headspace while here just because of the difference in language usage. Modeling this aspect has the advantage of not only clear communication between operators, but it establishes the character of the railroad as much as any locomotive paint job or trackside feature could ever do, and maybe more so because the act of speaking embodies the railroad's character in the person while they are speaking and thinking in this language structure!

In addition there is a set of instructions for how the radiotelephone actually works. The references to "Band A" and "Band B" are important, as well as the fact that when hanging up the handset, it automatically returns to Band A. If I get to the point of creating a radiotelephone system, this sort of information is very valuable - much more so than the purchase price of $3.

Martes, Agosto 26, 2014

New Jersey Junction RR Map 1911


1911 map of the New Jersey Junction Railroad
Some of the notable directors on the board of the New Jersey Junction Railroad in 1911 were William Rockefeller, William and Frederick Vanderbilt, and J.P. Morgan. So there must have been something of interest going on along this part of the Jersey Shore before Snooki. Taking a look at the vitals in the image below, the line ran from Weehawken headquarters to Jersey City for a grand total of 4.44 "main line" miles and .34 "branch line" miles. The cost of the road was $367K per mile and the stock price was $100/share.

Turns out that all the shares belonged to the New York Central and Hudson River Railroad Company (hence the big names involved), but there was certainly already lots of business to be had on the West Shore of the Hudson in 1911, and probably more importantly, the need for the connection between the West Shore RR (also owned by the NYC) in Weehawken to Jersey City and another access point to Manhattan, etc. Along the way the NJJRR ran across the Erie and the DL&W that went to the Hudson as well. The line ran right alongside the Erie's Weehawken Branch line, and I believe became part of Conrail's River Line branch.


The vital statistics of the NJJRR of 1911


Locomotive Project 1 GEXR 3856


GEXR 3856 returns to Stratford with loads from the Hayes-Dana plant in St. Mary's, passing ETR 0-6-0 #9. The engine, the auto frame plant, and even the steamer are now gone from the current GEXR operation. Ian Taylor photo, author's collection. 


One of my favourite things to do in the model railroading hobby is to take locomotives apart and rebuild them into other prototypes or a specific engine I’ve seen. Whether it’s a paint scheme not offered commercially or reworking an existing model for a local prototype, I enjoy both the mechanical work as well as the paint and finishing aspect of redoing an engine. This is the first in what will eventually be a series of the projects I’ve undertaken; I say “undertaken” instead of “completed” since I usually seem to start five projects and complete one before something else catches my interest and I get distracted and put the project on hold. But I digress…

Shortline engines often require some effort to model since the major manufacturers generally don’t offer models decorated for specific shortlines. Likewise, shortline engines often times are rebuilt or modified from factory designs and can be rather unique. One of the local shortlines, the Goderich-Exeter Railway, is a good example of the above point. During the period in which I model them (about 1999-2007-ish), the roster included no less than ten different paint schemes and about as many locomotive models. Similarly, as a Railtex – and later RailAmerica – shortline, units were often traded or swapped among other family roads; this all means that almost none of the units were commercially offered (the exception being FP9u’s 1400 and 1401 by Intermountain).

One of the first units I photographed when I got serious about photography was GEXR 3856, a GP38AC built for the GM&O in August 1969. After a stint as Illinois Central 9539, the engine and a number of its’ siblings were sold to RailAmerica for use on the newly-created New England Central Railway, operating the former Grand Trunk line in its’ namesake territory. As part of the start-up, the engine became NECR 9539 and received a snazzy blue and yellow paint job. After a number of years in New England, the perpetually power-short GEXR received the unit sometime around 1999-2003 (I’ll have to look up the transfer date I suppose) and it was quickly renumbered to GEXR 3856. Not much effort was devoted to the unit at the time, as the New England Central Railway logos on the sides and ends of the locomotive were patched out with the unit otherwise remaining in NECR paint. The unit continued on in service for a number of years until a broken crankshaft sidelined the unit in 2008. The future was looking rather dim for the engine at the time, with GEXR’s track record of consigning broken down units to the deadline in Goderich - a deadline from which several units did not emerge. Fortunately though, the unit was found to be worth salvaging and was sent to another RailAmerica shortline in Ontario, the Southern Ontario Railway, at Hamilton. Once there, several months were spent repairing the prime mover as well as numerous other defects resultant from years of hard work and minimal maintenance. Repairs included a new crankshaft, new horn, new truck frames, a hot-start system, cab metal repairs (corrosion had resulted in holes right through the cab walls), and a general tune-up. The unit was finally completed in January 2010 after which it was tested on SOR for about a week before leaving for the Ottawa Valley Railink, another RailAmerica shortline. The OVR had recently experienced a wreck that left that railroad power-short so north it was for GEXR 3856. At press time, the locomotive is presently at CAD Rail in Montreal receiving upgrades to bring it up to GP38-2 specs. This will likely mean a repaint and a change to the road number and reporting mark as the OVR is now part of the Genessee & Wyoming family. Like a cat with nine lives, hopefully this will keep the old girl around for a while longer. But for now, I’m happy keeping it as it was circa 1999-2007.

Pondering its' fate, GEXR 3856 sits quietly on a side track at Stratford with a broken crankshaft. Author's photo, 7/04/2008. 

A warm autumn afternoon finds GEXR 3856 in the company of ex-CN GP40 RLK 4095. The engine is waiting for parts before repairs commence at the SOR, ex-CN shop building behind the photographer; author's photo. 
Back from the dead, GEXR 3856 gets a break-in switching cars for Bunge with RLK 1755 while RLK 1808 has the morning off. The days on the SOR for each engine are numbered, with the GP20D invasion less than two months away. Author's photo 1/10/2010.


Fortunately for me, Atlas did a run of units painted for the NECR as part of their Master line of engines. Thus, it was a relatively straightforward project to create GEXR 3856. Most of the work related to the units’ external appearance. To begin with, the Atlas paint job was weathered moderately with acrylic paints; the NECR logos on the long hood and nose were patched with yellow and blue paint (Tamiya and True Line Trains respectively), and the can sides were also patched. Decals for “GEXR 3856” were cut from a Microscale alphabet set and applied over the patches; the numberboards were also changed to read 3856. A coat of Testors dullcoat was used to seal everything together. As the Atlas model was already pretty well detailed, very few add-on parts were required. One thing to be added is the rear mini-snowplow (“weedcutter” type by Details West).  Also, the model came from the factory with a fuel tank that was too large for the prototype; a replacement was sourced from the spare parts box, using a smaller Atlas tank that came with an undecorated GP38 engine from another project. One further detail to be modified is the horn; from the Atlas factory, it is located above the cab, but it will need to be moved to the top of the long hood, just forward of the oil bath air filter box. Other details to be added include an amber rotary beacon on the cab roof, and front/rear ditch lights. I plan to experiment with SMD LED’s and acquired some from Germany for use in this and other projects. Hopefully that won’t be too difficult to figure out; we’ll see. As it stands right now, the pain and some mechanical work is done on the model; the lighting and addition of some detail parts still remains, but that shouldn’t take too long to complete. When done, this will give me three GEXR GP38’s, the others being #3835 and 3821. I’ll have to post a group shot once completed.

An in-progress shot of the model shows that the paint work is mostly complete, with several details still to be added including snowplow, ditch lights, rotary beacon, new horn and numberboards. I'll post another photo once it's all back together; this one is taking me almost as long to rebuild as it did in real life, though SOR mechanics did a lot more work to the real thing!


Until then,
Cheers,
Peter.


Where to get Model rail track planning software mac


Nice Model rail track planning software mac

Construction erp software, work & procurement management, Softtech engineers pvt ltd specializes in construction erp software, providing work & procurement management and e-governance in india, uae, africa.. Latest topics zdnet, Latest trending topics being covered on zdnet including reviews, tech industry, security, hardware, apple, and windows. Technology news - 2017 innovations and future tech, Get the latest technology news, articles and op-eds. a look at the innovations and technologies that are shaping the future and changing the world..
Connect with earthlink, the award-winning internet service, Save on earthlink's award-winning internet services this post is great for you knowr home: dial-up, dsl, high-speed cable & more. plus, web hosting & software. connect with us!.
Train simulator official train simulator website, Train-simulator.com important notice. from tuesday 24th to friday 27th of january, train-simulator.com will be temporarily offline to allow for general maintenance.
Model t ford forum: forum 2014 - model t ford club of lake, Started january 1, 2014. the link to the previous forum is forum 2013 mtfca home forum 2015 posts should be related to the model t. off topic - ot - posts are.
these days i discovered the actual Model rail track planning software mac Detailed information about Model rail track planning software mac you have found it on my blog Before going further I found the following information was related to Model rail track planning software mac check this article

Sample images Model rail track planning software mac


Modern Image Southern - Layout topics - RMweb

recognize Model rail track planning software mac whom plentiful soul search soul take fortunate because come across Model rail track planning software mac

Well this Model rail track planning software mac share Make you know more even if you are a beginner in this field


Industry Profile 2 Bunge Hamilton ON


It’s been a while since I have done an industry profile, so here is the second installment in this article series for the blog.

Bunge

Bunge is one of the largest multi-national companies in the agri-business sector. One of its’ product lines is the manufacture and distribution of bio-oils derived from crushing various types of grains and seeds. To serve this market, the company has numerous processing plants in North America and abroad. One such plant is located in Hamilton, ON, and was acquired when Bunge purchased Can-Amera Foods in 2004.

Hamilton Plant

The Hamilton plant is what Bunge terms a crush facility – that is, it crushes grains or seeds to extract the oils from within. The plant is located in the industrial north end of Hamilton, at the foot of Wellington Street and on the edge of Hamilton harbor. Soybeans and canola seed can be brought in by both rail and boat, though the lake boats do not operate in the winter. The plant is served by the Southern Ontario Railway (SOR, a Genesee & Wyoming shortline) and often rates a switch job from the nearby Stuart Street yard to serve this plant alone. Occupying roughly three city blocks, the plant consists of a dump shed, various storage and processing tanks, a small three-track rail yard and a new tank car loading building constructed a few years ago on the opposite side of Burlington Street (connected by overhead pipeline to main plant). An interesting track arrangement consists of a diamond locate near the middle of the plant which allows the dump shed track to cross the spur serving the plant and its’ small yard (see photo below). A blue GE 45-ton centrecab is used to shuffle cars around the facility. The plant began canola oil production in 2007 and can crush 240,000 metric tons of seed per year. Much of the seed is sourced locally from Quebec and Ontario.

A Google satellite view of the Bunge plant in Hamilton, ON. The main plant is at upper left, with the newer bio-oil loading building located across Burlington street at lower center.


An annotated Google satellite view of the main complex showing the storage yard, grain unloading track and DDG loading track. At upper right is Vopak's terminal, which is used to bring jet fuel into the port via another slip out of view at right.


A Google satellite view of the oil loading building, constructed a few years ago. Note that the building can load not only rail cars but highway tank trailers as well. 

Operations

The plant is served on a daily or near-daily basis by an SOR job based out of the nearby yard. Loads of grain are spotted in the small yard and loads of distiller’s dried grains (DDG, sold as high-protein animal feed) are lifted from the plant. The dump shed track and DDG loading track are served from the west end of the yard. The tank car loading tracks located across the street are served from a parallel spur which also serves other industries in the industrial north end of the city. Another track running parallel to the boat slip is occasionally used to store grain cars until they can be unloaded.  Bunge seems to use railway-supplied equipment for bringing grain into the plant, but as railways do not supply equipment for DDG service or tank cars, Bunge maintains a fleet of both DDG cars (BNGX reporting marks) as well as 27,500 gallon tank cars (BRCX reporting marks). Additional tank cars are leased to bolster the company’s oil distribution capacity. Competitors ADM and Cargill likewise maintain their own railcar fleets.
CN 395614, a typical cylindrical hopper that can be used to bring grain into the facility (in this case empty, returning from the plant). This is one of the ex- CNWX Canadian Wheat Board hoppers that was sold to CN and converted to 286,000 lbs GRL. Aldershot, ON 3/30/2013. 


BRCX 1122, a Bunge-owned UTLX-built 27,500 gal tank car. Since this is an AAR 211 car it can operate at 286,000 lbs GRL; note that is is non-placarded (bio-oils are non-regulated). The car is seen at London, ON on 9/16/2013, en route to the Hamilton plant for another load.


PROX 76438, a 23,500-gal insulated tank car very similar to the Walthers model, which is appropriate for bio-oil loading. Aldershot, ON 5/31/2014.


This arrangement of the tracks can present an interesting switching problem, and if modeled, could provide quite a bit of work for an operator. In the yard, one track could be used for spotting inbound loads and empties, another for outbound cars, and the third for runaround moves. Once work is done at the main plant, the tank car loading building would also require the day’s loads be lifted and new empties spotted. Once switching is complete and the job is back at the yard, the consist would then be split between cars going to eastern destinations and those going to western destinations. If the plant were to be modeled such that it did not have its’ own switcher, there would be considerably more work to do positioning cars on the dump shed or DDG tracks.

Given that the complex is a combination of new and old buildings, structures, and tanks, this would be a great candidate for a kitbash – especially if you don’t mind running pipes all over the place! Structures from Pikestuff, Walthers, and others could be used for the buildings. A Walthers ethanol plant, with some modification, could make a convincing approximation of a bio-oil plant. Walthers also produces cars that could be loaded at the plant – their Trinity 6351 cubic-foot DDG hopper is appropriate as is their UTLX-prototype 23,500 gallon insulated tank car. If one were modeling an ADM, Cargill, or independent bio-oil producer, Atlas makes appropriate 27,500 gallon Trinity prototype insulated tank cars; modern hopper cars are produced by Intermountain, Exactrail, Tangent Scale models, as well as others.

If you’re looking for a relatively-large industry for your layout, one that can provide a considerable amount of switching, and you’re not afraid of a little kitbashing, maybe a bio-oil plant is worth considering.

Thanks for looking,

Cheers,

Peter.

Lunes, Agosto 25, 2014

Paving Roads


Model road build with Woodland Scenics Smooth-ItWith a bit of consideration, I decided that the next step of my layout would be the roads. As always, I researched the subject online and found that the most effective method would be to build forms and pour the roads with a plaster product. First however, I needed to plan where my roads were going. I determined my road width at 2 ½”, and cut a square piece of cardstock the same width. After drawing the contour of one edge of my planned road directly on my layout, I used the template card to draw the opposite edge. This allowed me to ensure the road was always 2 ½” wide.

Building road forms with foam tapeBuilding road forms with foam tape

Once the outline of the road was drawn onto the layout, I installed 4 laser cut wood grade crossings where needed. For the road forms, I used inexpensive foam tape that I purchased from a local dollar store. Woodland Scenics sells a similar product (called Paving Tape), but it was unavailable at the one and only hobby shop in my city.

Masking grade crossings and trackFirst layer of Woodland Scenics Smooth-It road plaster

I laid the foam tape on the outside edge of the road lines I had drawn. The tape I used was  ¼” wide, which allowed it to be easily pliable for any curves. Because my layout and grade crossings were not all level, I needed to use two, three, and even 4 layers of foam tape in several areas to allow the surface level of my road to be as level as possible.  For a smooth transition between the different levels of foam tape, I always made sure the very top layer of foam tape was continuous, instead of being stepped. This is very important when it comes to smoothing the top of the road.

Building road forms with foam tapeFirst layer of Woodland Scenics Smooth-It road plaster

For the road material, I used Woodland Scenics Smooth-It, a special dry-mix plaster product specifically designed for building roads and other smooth surfaces. I mixed the Smooth-It powder with water until it was the consistency of cake mix. Working in small sections, I slowly poured the mix between the forms, spreading and leveling it with the top of the foam tape forms using a wide piece of styrene. I made sure I masked the top of the wood grade crossings with masking tape, that way I could easily level the roadway with the top of the crossings.

Building road forms with foam tapeFirst layer of Woodland Scenics Smooth-It road plaster


Completed poured first layer of Smooth-ItSecond layer of Smooth-It with foam tape forms removed

After the first layer of Smooth-It had dried overnight, I applied a second thin layer, smoothing over any imperfections in the first layer and making sure the road was as smooth and level as possible. Once the second layer was completely dry, I carefully removed the foam tape forms. The roads were pretty smooth, but needed further sanding to improve the surface and remove rough edges.

Leveled ground for freight depotLeveled ground area for main street area


Complete road system after second coat of Smooth-ItComplete road system after second coat of Smooth-It

To sand, I used 200 grit sandpaper and sanded the road surface until I was happy with the smoothness. After I vacuumed all the dust off of the roads, I noticed some areas of my road looked more like the bubbly inside of an Aero chocolate bar then the surface of a road. This was caused from mixing my mixture of Smooth-It too thin when I poured it. If you do mix it too thin, add more Smooth-It and stir until the bubbles disappear, or let it sit for a few minutes, stirring often. To fill the air holes in the road, I simply added a thin layer of Smooth-It overtop, making sure to press it into all the holes so they didn’t reappear once I sanded the affected area again.

Model road painted with gray acrylic paintMain street sidewalk, building, and road line markings

I used a gray acrylic paint for the road colour, of which I applied 3 coats. I also coloured the wood grade crossings at this point with India ink diluted with water. Once the gray paint had dried, I marked the center line of the roads with a pencil, using the center line on the same cardstock template I used before to measure the road widths.  These lines would be a guide for the center line markings. I also marked out stop lines using the same method.

Stop and center line markings drawn onto roadwayStop and center line markings drawn onto roadway

Masked road stop lines painted with white acrylic paint

I masked the stop lines first, and then painted them with white acrylic paint. Once they were completely dry, I started to mask the center lines. To do this, I took blue painters tape and applied the required length to a piece of glass. I then cut the straight edge of the tape about 1/8” wide to make long, narrow strips. I peeled the narrow strips off the glass, and very carefully applied it to the road, following the contour of the center line I previously marked and making sure the straight edge of the tape was facing to the inside.

Masking for road center linesMasking for road center lines

Painting road center lines with yellow acrylic paint

I found that starting at one end of the road and only sticking down ¼ - ½” of the masking tape strip at a time worked best for getting smooth, straight lines. For curves, especially tight ones, I found that by holding the tape down with my one thumb, and positioning the next ¼” of masking tape with my other hand and then applying it by slowly sliding my thumb forward resulted in the best curves. I then did the same with the second strip of masking tape, ensuring the space between the two strips was as equally spaced as possible.

Pastel weathering effects on road and grade crossingsModel road build with Woodland Scenics Smooth-It

The lines were then painted with yellow acrylic paint, of which I applied about 3 coats. I then carefully removed the blue masking tape strips. Some small patches of the gray base coat did lift with the tape, but this was easy enough to touch up (just make sure you save some of your original road colour!). I found working in sections and not leaving the tape any longer than 20 minutes on the road greatly reduced the amount of paint that came up. Also removing the tape on a sharp angle helped, opposed to lifting in straight up.

Pastel weathering effects on road and grade crossingsCompleted model road build with Woodland Scenics Smooth-It

My roads were now complete, but looked a little too perfect and new. To add some weathering and usage effects, I sprinkled a very small amount of black pastel dust down the center of each lane and smeared it with my finger. I used the same effect on the grade crossings as well. Signage and other small details will come later, but at least the main roadways are now complete and ready to serve the various areas of my layout.