Ipinapakita ang mga post na may etiketa na other. Ipakita ang lahat ng mga post

Sabado, Nobyembre 19, 2016

Tools of the trade and other things


Well, finally finished up the upper level track change.  The trackage is done, did all the wiring and complete the signals.  This new track makes so much sense.  No pics of that because wiring is necessary but boring.  Tonight I wanted to cover a couple of tools that make my work on the layout so much easier.

The first one is my Klein Tools electrical nippers.  I have had these forever and believe at one time they were my dad's back when I was building a crappy layout in the basement in my late teens.  These do it all.  Pull nails, strip wire, cut Kadee trip pins, cut wire, cut wood, pull staples are a few.  I would be lost without them.  The bent shape them makes perfect for pulling nails out of the road bed.  The thing is, I have never sharpened them once in all these years.

The best tool I own.
The next item is something I made and is very handy.  I even have a drawer for them.  I call them my jumpers.  They are like jumper cables.  I use these to test track before it's wired and test my toggle switches before I solder them to my signals.  I also use a MRC DC power pack to power all my signals and switches.  With these jumpers, I test out signals, LED's (with resistors) and the like.   I use the power pack on the layout because it keeps more power on my NCE system and doesn't require me to have a booster.  I'm only running 2 amps.
Wire and alligator clips soldered together.
Here are the two signals down on the east end of the layout.  They are a simple 3 light signal from Tomar.  They have been hooked up to toggles and are ready to go.   
The electrical boxes in front of the Carolina trailer are temporary.  Been working hard in this area. 
Lastly, is a Tangent hopper that was painted into a Michigan Interstate hopper.  The MCIS is the railroad of Greg McComas and I do some of his custom work.  You can find the link to his blog on the right side of my blog.
 MCIS #7282 has shown up on the Midland with grain for Mid-Atlantic Feeds.


Martes, Pebrero 17, 2015

Since I am done with track work lets change it and other items!


Yes, the title says it all.  I was totally done with ALL my track work.  Done on both the upper and lower levels, feeder wires, the whole thing.  But, I was not too happy with the sand loading facility trackage and the double diamond, so I ripped it all out.

So I got some changes:

  • No more diamonds or city junction
  • The VA Midland receives another industry: the elevator at Mid-Atlantic Feeds.  
  • The sand facility will have more trackage with 2 spurs
  • With the elimination of the diamond, there will only be 2 signals in this area.

I really wanted to keep the diamond, but it only makes sense and what I had was very unprototypical.
Here's what I am doing.  This all makes more sense and will be a better operation.  It s a quick fix and the only hard part is redoing the feeder wires.   Moving the sand unloader will be no fun either.
No, it's not a wiring nightmare, I'm installing some LED lighting on the upper level. 

Got these light poles about a year ago.  I installed them around the layout, but never hooked them up.  Here's an example of one.  Got them off Ebay from China cheap.  

They definitely put out the light!  Almost too much.

Overall view of the area.  There are a total of 7 lights.

A little night photography?  All I am missing is the flashing red lights from the RR crossing apparatus.  


Huwebes, Hulyo 17, 2014

The Other Corner Café Kit


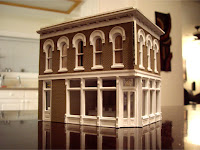
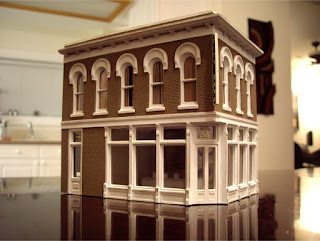
The Other Corner Café kit by DPMI wanted to add a bank to my small commercial district, and the DPM Other Corner Café kit by Woodland Scenics fit the bill perfectly. This was my first DPM kit, and if you have never built one either, it’s a very good idea to follow the preparation directions before assembling the model. The Design Preservation Model (DPM) series kits have high quality details and styrene but do require a good amount of sanding and trimming before assembly.
As I did with my Merchant’s Row I kit, I used small strips of masking tape to mask the windows and trim before painting the brick walls. Once the walls were dry, I covered the newly painted sections so I could now paint the trim and window frames. After drying for 24 hours, any touchups were made with a small detailing brush. The masking is tedious, but worth it in the end, however it’s only effective if it’s done correctly and carefully. If not, you will just have a ton of touchups to deal with. The structure was then brushed with dark powdered pastels for weathering effects and sealed with a final coat of Testors dull coat.

Blind assortment on 8” x 10” matt photo paper

Most DPM models do not come with a pre-molded roof or base, however bulk styrene is provided for at least the roof, which needs to be cut-to-fit. A length of strip styrene is also provided to be cut and installed to support for the roof. Clear bulk styrene sheet(s) are also included for the window glazing. Window blinds were used from the same templates I used on previous structures that I built.
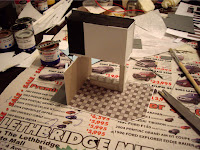
Removable first level of bank interior and light diffuserRemovable first level of bank interior and light diffuser


Styrene light diffuser boxFirst level interior with lit diffuser box

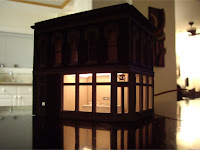
I built the interior structure of this building in almost the exact same way as may Merchant’s Row I kit, utilizing my light diffuser box method. The first level interior of the building is built upon a removable styrene base, with the light box installed on top (2nd level). The removable base allows access to the bulb in case it ever needs to be changed. I built the bank’s teller desks out of scrap styrene pieces, as well as the large support column (which actually supports the light diffuser box). The bank’s floor is a tile design that I made in Adobe Photoshop and printed on matt photo paper. The walls are just coloured cardstock.

Second level interior of the Other Corner Café kitSecond level interior of the Other Corner Café kit


The Other Corner Café kit with lightingBank interior with lighting

The second level interiors are actually attached directly to the main structure. I built these with a combination of dark cardstock and styrene plastic, which I secured directly to the inside walls. When the base and light box are inserted, the light box sits just behind the second level interior rooms. To allow light into the rooms, I simply cut small openings into the back walls. For the rooms I didn’t want to light, I simply omitted the rear opening to keep them dark.

Bank roof with medium burnt cinders from Woodland ScenicsThe Other Corner Café kit by DPM


The Other Corner Café kit by DPMThe Other Corner Café kit by DPM

I decorated the final structure with dry transfer decals from Woodland Scenics on the windows as well as a vertical corner sign that was left over from my Merchant’s Row I kit. For the roof material, I used medium burnt cinders from Woodland Scenics, which I spread about 1/16” – 1/8” thick. I then secured the cinders with thinned white glue that I applied with a small pipette, mixed with a few drops of isopropyl alcohol to break the glue mixture’s surface tension.