Ipinapakita ang mga post na may etiketa na the. Ipakita ang lahat ng mga post

Miyerkules, Disyembre 28, 2016

More progress on the layout A video


My summer vacation is slowly ending.  Back to the grind on Monday.  Thought I would update with a video this evening.  Enjoy!


Sabado, Hunyo 25, 2016

Quick Photo Im starting to like the town side of the layout


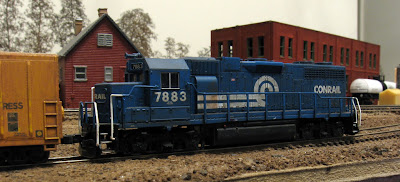
While shooting some photos of the mech reefers to show off on the Railwire Weathering Forum, I decided to take this grabber of 7883 posed on the team track on the town side of my current layout.
I was alway very nervous about getting this side of the layout right, but shots like this are starting to make me feel like I'm at least headed in the right direction.

Lunes, Hunyo 20, 2016

Voice on the River


In collection of author
An advertisement for Erie featuring the radio communications of the Erie navy. Good detail of the tugboat Scranton as well...

Huwebes, Marso 31, 2016

Better Models for the Masses


It cannot be overstated that the quality of scale models (in this case, N, but generally any scale) is currently at an all-time high and still climbing. The steady advancement of technology has provided us with manufacturing capabilities unheard of just a couple of decades ago.

That said, what good is quality, one may rightfully argue, if accuracy is not keeping pace? This thorny, argument-inducing issue is loaded with valid points to make on behalf of folks on both sides of the fence.

In defense of the manufacturers, as in any business venture there's a point of diminishing returns. Even the largest model makers have finite budgets and resources. There is always a clear line in the sand beyond which the company begins to lose profitability on any given mass-produced product; the lower the development investment, the greater potential profit—and profit equals more goodies for us. It is therefore necessary for us to accept that there will be a "good enough" rule applied across the board. We must also expect to see at least some "fantasy schemes" so that products find the broadest possible market and generate the greatest ROI.

The "good enough" rule involves two aspects of production: research and tooling. There are just so many human-hours that can be invested in researching a model before the budget is blown. And as for tooling, there may be a point at which a scale-width hood becomes prohibitively costly to tool owing to hard stops such as motor size. Yes, it may be feasible to make the hood the right width, but that last six scale inches may come at the expense of a different, more costly motor or all-new tooling for a chassis that could have been recycled from another loco.

In defense of the modelers, many errors would cost nothing to correct: the right paint color or road number costs the same as paint of the wrong. As Mike Skibbe summed it up in a previous post, getting it right expands the potential market: it will then appeal to the prototype modelers as well as the casual consumers (which includes collectors) who enjoy the model just the way it is, warts and all.


Let's take a specific example: for September 2007, Micro-Trains released a CP Rail 89-foot trailer flat loaded with intermodal containers, number 521135. However, this number is part of a series used for AAR type P782 81-foot flats (center photo, CP 521133). If they'd wanted to get closer to reality, they should have used a number between 5217XX and 5223XX, which appear on CP Rail AAR type P880 89-foot flats (bottom photo, CP 521719). Although the CP Rail cars have open decks, unlike the models, Micro-Trains could have improved matters a bit by positioning the containers at the extreme ends of the car. (Top photo, Micro-Trains; center and bottom photos, Joe Rogers, Railroad Pictures Archive.)

This information was obtained after just a few minutes of online searching. Which raises a curious issue: the Internet has become an incredibly potent research tool. It certainly cannot be a huge strain on a manufacturer to spend some quality time with Google, yet obvious and presumably avoidable discrepancies continue to appear time and again. As another example, the number boards on a soon-to-be-released diesel are off the mark, as several photographs of the real deal clearly illustrate. What is the reason for this oversight?

Once again, the manufacturer may have had any number of limitations imposed on the model's production; much goes on behind the scenes, out of our view. With respect to the number board problem, older tooling is being recycled. In other situations, getting absolutely every aspect of the model accurate may not be feasible given time and budget constraints. And, since most tooling is done overseas, there may be communications problems or quality control issues on the contractor's end. We could not hope to know all of the details.

Let us not overlook, too, the fact that tooling is an art form, despite being the domain of computers these days. Blueprints and photographs must be interpreted by humans before tooling can commence, and the results reflect the skill of those individuals responsible for the interpretation. Layer on the complicating factors of fitting everything over a mechanism designed by other engineers, and you have ample opportunities for the model to drift astray from reality. To see all of this in practical form, take three models of the same locomotive from three different manufacturers: they should all be identical, or nearly so, yet each is different—sometimes subtly, sometimes radically. Why? It's the quality of interpretation.

But take heart, as we may be witnessing an opportunity to make everyone happy, or perhaps at least happier. Online forums are being frequented by both manufacturers and their customers. This free exchange of information and perspective may provide the means for even better, more accurate models. But this assumes one thing: everyone remains civil. It seems inevitable that some hot-headed rivet-counter starts spouting off about how incredibly stupid everyone is at XYZ Company for having gotten the stenciling on a gondola wrong. If I were a manufacturer, I would not be inclined to go the extra mile to satisfy people like this. Would you?

All of this has given rise to one overarching question in the back of my mind: Why are some modelers getting so fussy? Our models are better-looking and more accurate than ever before. Are we becoming jaded? With a cornucopia of steadily-improving products, are we now beginning to expect too much? It used to be that prototype modelers were generally content to modify their models as needed to achieve accuracy. Now it seems some won't even buy a product unless it is perfect right out of the mold. What they don't seem to realize is that they're shooting themselves in the foot; not supporting a model maker reduces the chances of seeing more products, let alone better ones.
Miyerkules, Pebrero 17, 2016

Weathering Black Ideas for Weathering the Hardest Color to Weather


When my friends and I get together to discuss modeling, we almost always discuss weathering. And in our conversations, we always talk about how difficult it is to weather black locomotives and freight cars. How come it's so difficult? For starters, it's almost impossible to get rust colors to "show up" on a black surface. Simply painting surface rust and rust streaks over black is futile - the paint disappears unlike it does on lighter colors like yellow or even boxcar red. So before you weather black, you have to take extra steps to fade the black before you do any weathering work. Ok, follow along.

Getting Started

I wanted to paint Kato's new NW2 into Indiana Harbor Belt's early scheme. This scheme lasted at least until the late 70's, and a look through all the photos on http://www.rrpicturearchives.net show some pretty well-worn IHB prototypes. So in this example, we have the flexibility of mixing colors that custom painting affords. If your model is already painted and just needs weathering, the ideas in this article can also be used.

I start by stripping the Kato paint with 91% alcohol. It takes a few hours for the alcohol to break down the paint so that it can be brushed away with a toothbrush.

Layers of Grime

Typically, a black engine or freight car's will fade to a variety of gray/dirt/grime colors. It really depends on the prototype. It's possible to have a layer of green grime, tan dust, gray or brown dirt over top of a base coat of black or a faded black (maybe this is dark gray-again, it depends!). In the prototype photo that I chose to model, there was a fairly black base coat still showing through patches of gray, green, and tan.

Painting the Base Coat

I chose a slightly lighter color than black for a base coat - Polyscale Tarnished Black. If you have an already decorated model, you probably want to skip this step, since it'll cover up any heralds and road numbers. In this case, apply a fade coat to your model by painting with a thinned light tan or gray color. Note that in this photo, the shift away from true black is drastic. Subsequent additions of color will darken the model.

Adding "Dirty Blends"

The idea here is to apply overlapping colors with the airbrush, or if you choose, paint brush. Try a combination of dry brushing and washes. Remove some colors with 70% alcohol. Apply some surface rust.

Black washes allow you to tone down and blend colors that appear too bright. Since correction is so easy, it's better to go too light than too dark in the base coat.


Conclusion


By starting with a color lighter than black, any weathering you apply will "pop". Try these ideas out on hoppers and tank cars!

Miyerkules, Disyembre 2, 2015

End of the week update July 26th 2015


Not a whole lot going on on the layout this week.  Most of the things I have gotten done were earlier in the week.  The layout has not had much progress on it since the redoing of the track to the helix.  I need to get that scenery back complete.  This week has been devoted to installing laminate flooring to the living room.  300 plus square feet of it.  Hard work but it looks great.  We are just about finished. One section of shoe moulding and a little paint is it.


I did get some motive power updated with some Tsunamis in the last two weeks.  Here they are:
Finally got MP15 #284 back in service.  It was a QSI sound chassis at one time but sold it because it sounded terrible.  Picked up a non-sound chassis to have Tsunami but on it like her sister #285.  Finally got it installed.  Not an easy task at all.

GP40 #299 finally go a Tsunami installed in her.  I even put an operating beacon in also.  I used a tiny LED and installed into the beacon.  These LED's are perfect for this.  Just cannot remember who makes them.  

New VC power #105 SW1200 got weathered up a bit.  No sound yet.
Hey who's layout room is that?  That would be yours truely from MRH discussion this week about small layout rooms.


Huwebes, Oktubre 22, 2015

Guide to a Simple Train Around the Christmas Tree


Since the first model train came into existence (Lionel in Germany in the 1830's) , kids and adults alike have dreamed of a Train around the Christmas Tree. It has become a special Holiday Tradition in many homes.


Remember the simple track you used when you were a kid?  Remember the train stopping or not running properly around the tree?  This was most likely because of all the dust, pet fur and other nasty surprises that can get drawn into the wheels and gears of the Locomotive.
 The train sets today have EZ Track (HO & N scale sets) or FasTrack (O scale sets) so you can put the track directly on the floor or on fabric and not have to worry too much about this problem. Although learning to maintain your locomotive is a good idea. Cleaning the wheels and gears weekly if you run it frequently, just to have that uninterrupted level of fun!

N & HO EZ-Track, O Lionel FasTrack

So let's get to why you are here:  Setting up a Simple track and train around your Christmas Tree!
Things You'll Need:

  • Electric Train Set, with  track and power pack (choose a scale suited for the area you have- the most popular are HO (1:87 scale), O (1:48 scale), and G (1:22.5 - 1:25)
  • piece of plywood (optional)
  • Christmas Tree with a stand


  1. Your Train - After a year in storage, your trains may need a little cleaning. In addition to brushing off the dust, the track and wheels need to be thoroughly cleaned. Older, steel track is prone to rusting if stored in humid locations. If your track shows signs of rust, save your time and just replace it. Clean wheels with paper towels and cleaning fluids.
    After extended periods in storage, it may be necessary to disassemble, clean and re-oil locomotive gearboxes. Do not over-lubricate.  (If you bring in your Train, we can teach you how to do this. There is no cost unless replacement parts are needed) Check power supplies and wires for any signs of wear or distress. Replace if needed.  There are many different sets with Steam and Diesel Locomotives, in different scales to choose from should you need to purchase one.
  2. Track - See how much track you have (most sets for HO come with a minimum of a 36" circle or 36"x 48" oval- which is usually enough for a simple 'around the tree' layout). Most O scale sets come with a 40"x 60" oval- but check the box first!)  When adding more track into your oval or circle, you MUST add two.  Meaning, if you add a rerailer track that's 9" to one side, you must add an equal size to the opposite side so the layout doesn't bend and break. This is the same for curves.  If your track does not have roadbed built into it, place down a piece of plywood first.                                                       
  3. Measure the area from the base of the tree out to make sure you have enough track for around the base of the tree. Keep in mind where the presents will go.  We usually have a space to either side of the track (on the outside) so we can run the train while opening gifts.                                                              
  4. Keep It Simple - If you are only running the train for the Christmas Season, keep your track plan simple (to an oval or circle). If you want it a little more than just the traditional track plan, try these: 
    HO  Oval with incline

    HO  or O  plan

    Twice Around The Tree plan

    Twice Around The Tree Finished in O scale

    For small tree - HO scale plan.     For a larger tree- O or G scale plan

  5. Assembling the Track and Testing the Train - Assemble the track, Make sure your electrical connector track is in an accessible position with the wire hookups facing the outer rim of the track circle.
    Connect the power pack to the track as directed by the instructions and test the flow of current using the model engine. Make sure it can circle the track at half speed without hitting a bump or falling off.
    Test the train one more time before putting the tree in place and decorating.                                          
  6. Make it Kid Friendly - Christmas trains are meant to be enjoyed by all ages, and they are a great introduction into the hobby for children. One easy way to make any model train display more kid-friendly is to make them part of the action. In addition to running the trains, kids will want to help build and decorate the layout. Incorporating kid's toys into the display is a great way to make it personal and still keep a holiday feel.                                                                                                                         
  7. Cleaning - If your trains are running beneath a Christmas tree, you'll probably find yourself pulling needles off the tracks by the end of the season. There is no great secret to keeping needles off the tracks (even an artificial tree will probably lose a few.) 
    Make sure you can reach all the way around the tree to clean. Make sure vacuming needles won't result in losing other scenic material or details.
    One additional concern for under-tree-trains is the power supply. Make sure your electrical circuit can handle the needs of both the trains and the tree lights. And make sure the cords for both don't interfere with the tracks.
  8. Packing and Storing

    ©2010 Ryan C Kunkle, licensed to About.com, Inc.
    Next year's display begins when you put this year's away.
    • Before you pack, take the time to clean track and wheels again.
    • Pack trains, tracks, power supplies and all accessories carefully. Use original boxes if possible.
    • Store your trains in a dry place. Store fragile items where they will be safe.
    • If possible, give your locomotive a brief break-in run periodically throughout the year.

Some Final Tips to keep in mind:

  • The lower branches of your tree will need to be trimmed up to allow enough room for the train to circle as well.
  • The temptation may be to get a big train with lots of buildings, switches, figures and lights, but under a Christmas tree, limited space makes this impractical.
  • For the same reasons, a Christmas train should be limited to a single engine and four cars.
  • If your train set comes with securely locking tracks, you can avoid using plywood as long as the track will stay steady (for example, on a hard wood floor). Carpeting can create problems.
  • If your train wobbles or comes off the track easily, disassemble the rail cars and glue weights inside to keep pressure on the track.
  • Experiment with speed, but remember, a train flying around the track will also fly right off.
  • If children will be operating the train, very young kids may have more success with a larger train gauge like 0 or G. It will be easier for them to hook the cars and place them on the track.
  • While the voltage of a train power pack is not great enough to cause real damage, you should use a watering can with a long spout if you are using a live or cut tree. Water can damage the train and cause a short.


Thank you for reading our blog. Please feel free to leave a comment or email us a comment. 
Also check us out on Facebook, Twitter, Pinterest and our Website!


Happy Hobbying!


Want to learn more:
First Model Railroad
Maintaining Your Locomotive
Replacing Model Train Wheels
Small Layout Holiday Ideas
Twice Around The Tree- Full Article

source 1
source 2

Miyerkules, Setyembre 30, 2015

Locomotives on the HOG


Bob Wheeler is a heck of a diesel guy, so Steve got him to construct the locomotives on the layout. To read about how it did it, go to the NMRA's Southeastern Division Magazine called The Southern http://www.ser-nmra.org/pdf/souv49n3.5.pdf
Below are the decal masters for printing on a laser printer. I was surprised at how easy it is to make your own decals.


Sabado, Agosto 29, 2015

Progress on the layout corn syrup facility and woodchip facility buildings


Some progress this week on the layout!  I'm going to focus on mainly the layout the next couple of weeks to try and finish at least the corn syrup facility.  The last two days has consisted of mocking up the corn syrup facilty I had formerly named Valley Sweeteners.  After consulting with my good friend Greg McComas (His Michigan Interstate Railroad) he suggested I change the name to Chesapeake Valley Confectioners (CVC).  This would allow more than just tank cars.  Pneumatic hoppers could also be unloaded.  The facility features one track that goes into an unloading building.  This building could unload various cars such as hoppers and tank cars.  The building can hold two cars.  I was considering adding another track but Battlefield Yard is under capacity now and adding more cars would not help.
My first version of the building.  A combination of Walthers Washington Salvage Yard and Pikestuff walls.  The office building will be cut down to be back from the tracks. 

One of the pressureaid hoppers that can carry loads for the facility.  Already had it weathered and ready to go!

Version #2: Added in another wall with a truck door.  This will be my final mockup.  

Over on the Mine Run Spur, Mine Run Limber is getting some work.  I have the woodchip loader ready to go but wanted a bulding to have the chips coming from.  Thinking about having a inside loading spot?

The spot could have a removable cartridge for one boxcar.  Or I could just put the door on the building and leave it.  What do you guys think?  I find it odd( but not too far fetched) to have the spur go under the chip loader to the building.  Locomotives would never go under it.  The facility would always have enough cars to reach the building.  

Overall view of the facility.  The Apache chip hopper will be patched.  I have 3 of these.  

A little garage I have been working on.  It's from BEST.  Just need the doors and window attached and some weathering.  Even got some shingles for it.   


Linggo, Enero 4, 2015

2016 Mid Atlantic RPM Meet is in the books!


We just finished up the annual Mid Atlantic RPM Meet this past Friday and Saturday.  It was a great time with great models, vendors, friends, speakers, layouts and food.  I want to thanks our fearless Norm Wolf for put on a top notch meet.  Also thanks to Bob Sprague, Butch Eyler, and Daylene Wolf for their dedicated work.  These guys and gal are wonderful to work with!  Looking forward to the next one on September 22/23 2017.

Here are all my pics:2016 MARPM meet pictures

Butch Eyler's incredible weathering 

Butch Eyler's

Peter Koehler-Pfotenhauer

My RF&P stuff

Some more of my stuff

and more of my stuff


Miyerkules, Disyembre 3, 2014

Up off the ground


My better half  had an old school friend over today, so I was asked if I  "had some work I could do outside today?"

 Great, I sure do!
I headed straight out to the shed to see if I could finalise the fascia and frame, and get the whole layout up onto legs(well...chairs)

It took me several hours, but finally the layout was up on the 5 chair frames. They are nice and steady too.

Unforunately, the chairs can't be raised in height and are a bit low/short(the track is at stomach height), so they will only be used while I construct the layout.

I also took the opportunity to weather some of my fleet with the airbrush while I was out there and I will upload those pics next time.
Here is a shot of the join between 2 of the boards, with the chair frame underneath.

Again, just laying the track loose to get the feel for thetrackwork,  this is the crossover at the city end of the platform, Most trains arrive and depart from the lower right track over the points to the platform,top left track. The loop is top right, storage siding is lower left track.
A lone 4 car set sits at the city end of the storage siding area, not going anywhere yet (no track down). 
Close up of one of the baseboards joining the next...


Lunes, Oktubre 13, 2014

New video on the various trains that make up the railroad


Linggo, Hulyo 27, 2014

Magazine article on the Virginia Midland Railroad


About this time last year, I was approached by Stefan Nilsson from the Swedish magazine, Modell Jarnvags Magasinet.  This is the most popular model railroading magazine in Sweden.  He wanted me to write a decent size article on the Midland and even add some pictures.  He gave me plenty of time to do it as the magazine only comes out 4 times a year.  I felt it was a great honor a to be included in a magazine as I always wanted my layout to be able to be in Model Railroader here in the states one day.  It was a lot of fun and Stefan was easy to work with and it turned out very well.  The Magazine was published back in March.

It also shows in great detail how the Midland works and a history of why and how I built the layout.

Here is the front of the magazine.
Here's the first 2 pages of the 6 page article.  Anyone read Swedish?  I did get a English version of the article.  That's below.


Martes, Abril 22, 2014

Eye in the Sky


As you know I recently installed a helix in my garage.  I want somehow to watch it as the train made progress.  After a little research, I decided to get a security camera from Harbor Freight Tools.  This camera easily plugs into the video section of the TV I have in my office.  The cord is plenty longer and installation only took about 45 minutes.  I spent about $30 on it (using a 20% off coupon).  It does it's purpose and I am very thrilled so far.
Hardest part of the installation was installing the camera on the wall.


The helix in the garage with the camera watching overhead.
I watch DVD's occasionally on the this TV.

Closeup of the view.  I need to put the helix in a little better view of the camera.

VC #5:  She is a Kato GP35.  I recently put on a non-dynamic brake cover and covered the middle radiator fan.  Some kind of rebuild.  I was thinking a GP35R?