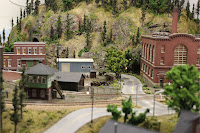
To assist with adding accessory lights as I constructed my layout, I planned all of the wiring into my master wiring plan at the start of construction. I pre-installed power bus wires under my benchwork, and installed switches on my control panel to turn power to the bus wires on and off. The bus wires are powered directly by a dedicated, 12V 2A DC power supply, and are split into two separate circuits, accessory 1 & accessory 2. These two circuits are each controlled through two automotive-type relays connected to a corresponding toggle switch on the main control panel.
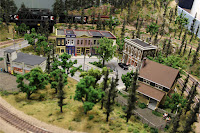
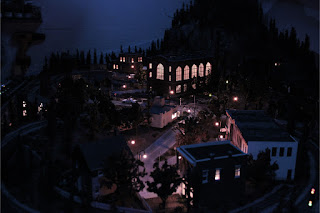
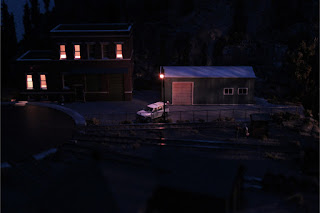
The majority of my structures had lighting installed during their construction (see any of my posts regarding structure kits for details). I left a long wire lead protruding from either the bottom or side of each building, which I then passed through a small drilled hole in my benchwork and tied it into the pre-installed power bus below. Any visible wire leads on top of my layout were simply hidden with scenery material.
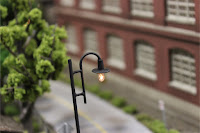

The brass street lamps along my streets were installed with the same method, however I did need to wrap the base of each lamp a couple times with electrical tape to provide a snug fit once I inserted them into the drilled holes. The street lamps are rated for 12 volts, but a full 12 volts produced way too much light, so I added a 110 ohm resistor to each street lamp to provide a softer, more realistic glow. Both the building lights and street lamps are wired onto the accessory 1 circuit.
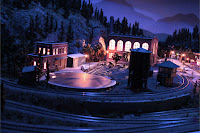
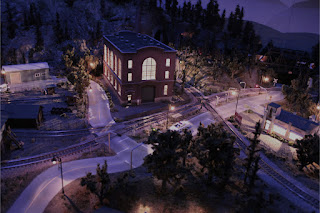
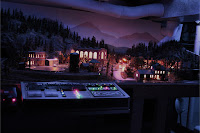
Accessory lighting on your layout is most effective when, quite obviously, the room that houses your layout is dark. However, having a completely dark room, void of any light, is much too dark and the majority of your layout will not be visible. You can create low levels of ambient room lighting by simply dimming the room lighting, but this is only effective if you use halogen or incandescent-type bulbs as most fluorescents are not dimmable. If you use fluorescent lighting (like I do), you will need to completely turn off the lights. More so, dimming your layout room’s lights still doesn’t create a realistic night-time light, so the most effective method (in my opinion), is to have separately installed “night mode” lights.
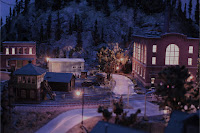
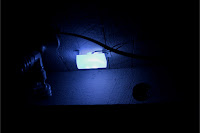
For this “night mode” effect lighting, I wanted to recreate a moonlit scene, so the light needed to have a soft, bluish-white glow. To create this type of light, I constructed three light diffusing boxes out of styrene measuring 2 1/2” x 4 1/2” with a curved diffusing lens protruding out from the base by about 1 ¾”. I then installed one super bright white and one super bright blue LED into the base of each diffuser box, about 1” apart from the center. After adding the proper resistors to each LED, I wired all three of the diffuser boxes to my accessory 2 lighting circuit and installed them to the ceiling above my layout.
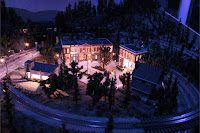
The diffuser boxes combine the intense light from the blue and white LED’s and emits an even, soft bluish-white light similar to moonlight. This emitted light provides just enough of a natural nighttime effect that the entire layout is still visible, while allowing your scenery lighting to stand out and be the main focal point.
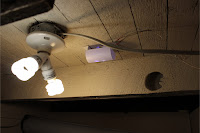
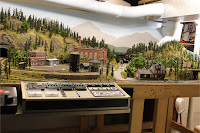
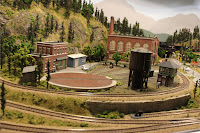
As I mentioned before, I use fluorescent lighting for the main lighting of my layout. I originally had installed standard incandescent bulbs over my layout, which were fine during construction, but recently changed to mini fluorescent spiral bulbs. I use 6 of these bulbs (3 bright white and 3 warm white) in combination to produce a bright, natural daytime light. I found that incandescent bulbs alone produced way too much yellow-red light, and the typical bright white mini spiral florescent alone produced an unrealistic blue hue. I also uninstalled the large florescent ceiling light next to my layout, as it cast a very blue, overpowering light onto the right half of my layout.

The majority of my structures had lighting installed during their construction (see any of my posts regarding structure kits for details). I left a long wire lead protruding from either the bottom or side of each building, which I then passed through a small drilled hole in my benchwork and tied it into the pre-installed power bus below. Any visible wire leads on top of my layout were simply hidden with scenery material.
The brass street lamps along my streets were installed with the same method, however I did need to wrap the base of each lamp a couple times with electrical tape to provide a snug fit once I inserted them into the drilled holes. The street lamps are rated for 12 volts, but a full 12 volts produced way too much light, so I added a 110 ohm resistor to each street lamp to provide a softer, more realistic glow. Both the building lights and street lamps are wired onto the accessory 1 circuit.
Accessory lighting on your layout is most effective when, quite obviously, the room that houses your layout is dark. However, having a completely dark room, void of any light, is much too dark and the majority of your layout will not be visible. You can create low levels of ambient room lighting by simply dimming the room lighting, but this is only effective if you use halogen or incandescent-type bulbs as most fluorescents are not dimmable. If you use fluorescent lighting (like I do), you will need to completely turn off the lights. More so, dimming your layout room’s lights still doesn’t create a realistic night-time light, so the most effective method (in my opinion), is to have separately installed “night mode” lights.
For this “night mode” effect lighting, I wanted to recreate a moonlit scene, so the light needed to have a soft, bluish-white glow. To create this type of light, I constructed three light diffusing boxes out of styrene measuring 2 1/2” x 4 1/2” with a curved diffusing lens protruding out from the base by about 1 ¾”. I then installed one super bright white and one super bright blue LED into the base of each diffuser box, about 1” apart from the center. After adding the proper resistors to each LED, I wired all three of the diffuser boxes to my accessory 2 lighting circuit and installed them to the ceiling above my layout.
The diffuser boxes combine the intense light from the blue and white LED’s and emits an even, soft bluish-white light similar to moonlight. This emitted light provides just enough of a natural nighttime effect that the entire layout is still visible, while allowing your scenery lighting to stand out and be the main focal point.
As I mentioned before, I use fluorescent lighting for the main lighting of my layout. I originally had installed standard incandescent bulbs over my layout, which were fine during construction, but recently changed to mini fluorescent spiral bulbs. I use 6 of these bulbs (3 bright white and 3 warm white) in combination to produce a bright, natural daytime light. I found that incandescent bulbs alone produced way too much yellow-red light, and the typical bright white mini spiral florescent alone produced an unrealistic blue hue. I also uninstalled the large florescent ceiling light next to my layout, as it cast a very blue, overpowering light onto the right half of my layout.


0 (mga) komento:
Mag-post ng isang Komento