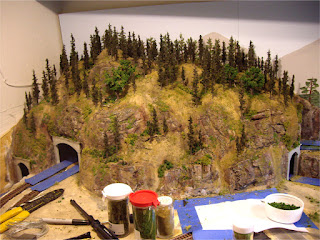
I’ll first start by saying that I don’t really have any evolution photos of the scenery on the mountain but only before and after shots. This is because I did a lot of experimenting with different ground cover and techniques, and before I knew it, my scenery was pretty much complete before I even considered taking photos. So instead, I will describe the materials used. The terrain and rock croppings were already previously painted (see my “Painting the Terrain” post), so I didn’t have to worry about this step.
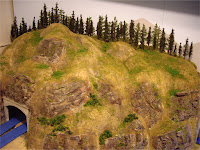

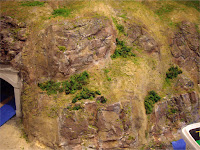
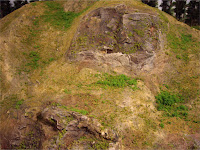
I started by liberally applying thinned white glue with a paint brush directly onto the painted terrain, spreading it over about 6” by 6” sections at a time. I then sprinkled Woodland Scenics earth-blend blended turf over the wet glue. The earth-blend turf seemed to really compliment the tan colour paint I had used on all of the hard-shell terrain. I used the same firm’s green-blend turf to then highlight certain areas, such as more level areas where green grass would be more prevalent. I had a rather large gap between the bottom edge of my backdrop and the mountain terrain, so I filled this space using light green lichen, also from Woodland Scenics. Everything was then sealed in with a light spray of thinned white glue.

Trees were the next step, which I had previously completed putting together (see my previous post). I started with smaller trees in the background, placing them quite densely so they would blend into my backdrop. As I moved forward, I used increasingly taller trees which seemed to add a bit more depth to the forest. I also found that placing tall and short trees side-by-side made the terrain look steeper than it actually was. I didn’t use the supplied bases that came with the trees armatures; instead I drilled small holes directly into the plaster terrain so I could attach the trees using the small insert pins at the bottom of each tree. Any plaster dust that came up from drilling was carefully blown away with a can of compressed air.


Bushes, coarse turf, underbrush, lichen, and other various types and colours of ground foam were added next, mostly all from Woodland Scenics. This step took a lot of trial and error and paying around with different materials to achieve the look I wanted. However, nature is quite random and has a lot of variety when it comes to colours and plant life, so applying the different scenic materials in a haphazard manner only adds to the realism of the forest scene. I chose mostly Woodland Scenics material because the different ground foams and colours can be easily combined in any way and still look natural, which is a great, fool-proof method for first-timers!
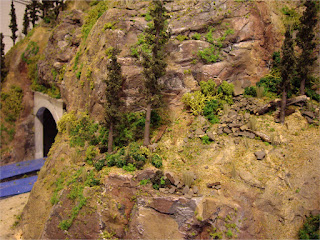
To finish the scene, I added natural talus rock that I found in the coulees near my home. I added small tuffs of Woodland Scenics field grass in random areas, and added any additional details in spots that I may have missed. For deadfall, I used small wood pieces that I carefully picked out of a bag of old potting soil, as well as real deadfall I found in nature.


I’m quite happy with the final results, and will continue this process across the rest of my background mountainous scene over the next month. It makes sense to finish the background scene first, as I wouldn’t want to be reaching over a completed foreground scene to work on it.


0 (mga) komento:
Mag-post ng isang Komento