As this is my first layout, almost every aspect of the construction of model railroading is new to me. Most tasks are trial and error, and the amount I’m learning is extraordinary. At the same time, I’m also seeing where I went wrong, and the biggest error is the grade leading off of my trestle down to the 60 degree crossing. This has been a huge issue since I first designed the layout. Engines would high center at the top of the hill, and the cattle-guards would catch on the crossing, always causing derailment. This grade had to go, so back to the drawing board I went. With a little better planning, I managed to take the grade from almost 11%, down to just over 6%.

I removed the entire grade to start fresh. I took two things into account when re-planning the grade. The first was that I needed to try to make the distance from the 60 degree crossing to the end of the trestle longer. Second, I had to decrease the height of the trestle. These two items were essential in making a more successful grade.


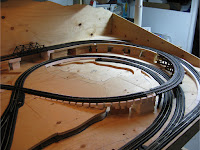
For the rest of the grade, I used a 4% foam starter grade from Woodland Scenics. This allowed me to easily transition from the crossing level up to the edge of the trestle. I then used custom cut foam supports to make sure the grade stayed in place and had proper support. I then added foam roadbed and once continuous piece of flex track to ensure a continuously smooth track. The end result was flawless! No more derailments and no more high centered engines!

1. Plan first and know your limits! When designing your layout, try to give yourself as much room as possible for up/down grades. There are physical limits to how steep your train can travel.
2. Keep your grade as consistent as possible, with smooth transitions at each end. This is a problem I ran into. My transitions at the top and bottom of my downgrade were very extreme, resulting in my engine getting high centered at the top of the grade and bottoming out at the bottom of my grade.
3. Crossings require level track leading up to them to prevent couplers and cattle-guards from catching on the crossing track. If you have a grade leading to a crossing like I do, make sure the grade is no more than 2% for at least 8” before the crossing.
4. Experiment. Play around with different grades with actual track and engines before you make anything permanent. Allow for adjustments, and if it doesn’t work the first time, find what’s causing the issue and retry.
5. Don’t let anyone ruin your fun. Most professionals would laugh at a steep grade over 2%, but don’t let that discourage you. Make a layout as you see fit, after all, it’s your train and your imagination! Do what makes you happy and proud.


0 (mga) komento:
Mag-post ng isang Komento