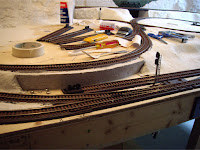
For my terrain structure, I opted to use the hard-shell method, consisting of cardboard strips, plaster infused paper towels, and a final layer of plaster. This seemed to be a popular, tried and tested method, and though messy, the materials are very cheap and the end results are very effective.
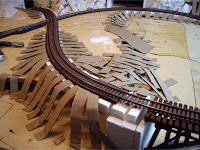
I first started by cutting several different length strips from a cardboard box, all between ½ and 1 inch wide. The strips were then bent to the desired curvature and fastened to the benchwork with either white glue or staples, or a combination of both. I spaced each strip about 1 inch apart. For most of the strips, I didn’t require horizontal support strips, except where the vertical strips were longer and tended to sag a bit more. Crumpled newsprint under the strips also helped with support in some areas.
At this point, I also incorporated some crock croppings that I had cast with plaster earlier. For the more rugged looking terrain features, I used the same crumpled paper method that I used for my mountain tunnel. For future planned roads, I simply cut a desired sized piece of cardboard and attached it just as I did with the other strips, ensuring a smooth grade from the upper level to the lower ground level.
The next step was to cover the cardboard strips with plaster-impregnated paper towels. For this, I first tore sheets of paper towel into strips at various widths. Make sure you have a good mixture of thin and wide strips, as it’s a lot easier to cover a large area with wide strips then several small thin strips, and vice-versa for small areas.
I mixed powder drywall compound into a large, shallow container with water. This took a little trial and error to get the right consistency; if too thin the paper towel strips will dry and peel, and have no rigidity. If too thick, the paper towel will just rip under the weight. I found a consistency of oatmeal worked best. Good quality paper towel also helps immensely. I had to keep stirring the plaster mixture as I went, as the plaster tended to settle to the bottom of the container. Adding a bit of water to the mixture as I worked will also keep things flowing. 

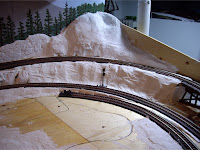
Once I had found the proper plaster mixture, I dipped each strip of paper towel into the mixture, wiping off the majority of excess plaster from the strips with my fingers. I then positions the paper towel strips horizontally across the cardboard strips, overlapping them for added strength. I didn’t worry too much if the paper towel strips sagged a bit between the cardboard support strips as this would be leveled off later with the final plaster layer. I used my fingers to smooth the strips as much as possible. 
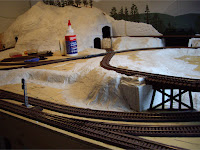
After 24 hours the paper towel shell was dry, and I was left with a rigid but brittle shell. The final step was to cover everything with a final coat of plaster, which greatly strengthens the shell, and smoothes out the unsightly seams of the paper towels. I used a gypsum based plaster, but made the mistake of using a pre-mixed product, which is way more prone to cracking and shrinking then dry mix, and resulted in filling in a lot of cracks. I also cast a retaining wall (as seen above) using a paper mold that I made directly on the layout. The wall is cast with plaster of paris, and finished with hand carved bricks. 


0 (mga) komento:
Mag-post ng isang Komento