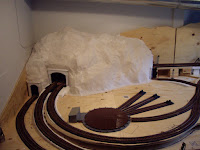
I started building the basic mountain structure by bunching up news print into various sized balls, held together with masking tape. I then started placing the crumpled paper balls over and beside the tunnel structure.
I started with the largest pieces first, and worked my way up with the smaller pieces. I crumpled paper into specific shapes in certain areas, and re-arranged the paper until my mountain was the basic shape I was looking for. Once everything was in place, I used long pieces of masking tape to hold the paper structure in place.
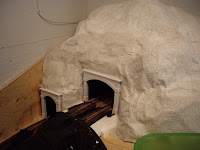
Using plaster cloth that I cut into 3 – 4 inch strips, I started to cover the crumpled paper, overlapping each strip by 1 – 2 inches. I started at the top, and worked my way down, ensuring there were no gaps and used my finger to smooth out any rough edges. I kept my tunnel portals in at this time so I could ensure the plaster cloth and portals fit together correctly. Once the first layer of plaster cloth was dry, I put on a second layer to make a sturdy, hard shell.
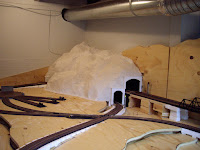
While the large mountain was drying, I built a second small mountain at the opposite end of my layout. I used the same method as before, arranging crumpled paper to get the desired shape, then covered it with plaster. I also added a rock casting that I previously made using a Woodland Scenics rubber mold and plaster of peris. I held the rock casting in place temporarily with tooth-picks until I was ready to use the plaster cloth.
Once the plaster cloth was dry, I used a soupy mixture of plaster of paris to cover the entire mountain structure to give it its final shape. Now I must admit, using plaster of any type is probably my least favorite thing to do. Plaster of paris is difficult to use as it sets extremely quickly, so there is only a small window to work with it, and you must use small batches at a time. I would have loved to use sculptamold, but the one hobby store in Lethbridge that sells it is closed for a month as they relocate. 
I attempted to carve rock faces out of the set plaster, and found this to be very difficult, and not the right affect I was looking for. The carving worked in some areas, but not all as the plaster was either too soft or too hard, and just chipped away from the plaster cloth. In the problem areas, I used shallow molds that I made out of aluminum foil. This was also problematic as they need to be placed on the mountain at just the right time, or else they would crack and crumble, or just ooze out of the bottom of the mold.


0 (mga) komento:
Mag-post ng isang Komento