Ipinapakita ang mga post na may etiketa na Tower. Ipakita ang lahat ng mga post

Linggo, Hunyo 12, 2016

Atlas Water Tower Kit


Atlas Water Tower Kit
I purchased an HO Atlas Water Tower kit quite a while back, even though I originally had no intention of using it on my layout. This was mostly because my layout wasn’t going to be set in the steam-era, and lack of space on my layout. However, now that most of my structures are situated on my layout, I decided that that maybe I could make room for it after all. And as for it being from the steam era, well that hardly mattered as there are still many original water towers standing today, some still even currently being used. The water tower will stand in front of the turntable, directly to the left of the signal tower, and will service directly on the main line track.

Unpainted Atlas Water Tower kit pieces
The first step was to paint the components that made up the main structure. The Atlas Water Tower kit shows the completed model painted with a light green tank, however I opted for a more generic look by painting the entire structure brown. I started by spraying each piece with Camouflage Brown Krylon paint, then letting them dry for 48 hours. The brown base coat was quite dark, so I mixed several washes of brown enamel at different shades, and randomly painted different pieces of the superstructure with the different shades of brown. These slight colour variations add a more realistic, natural look to the overall wood structure. The same process was also used on the vertical planks that make up the main water tank.

Water tower under construction
Assembling the pieces was quite straight forward, and all the pieces fit snugly together. I needed to scrape off paint on every joint of the tank’s support structure to ensure the pieces slid completely into each other. For the roof, I first painted it flat black, then dry brushed it with satin aluminum enamel paint. I finished it with orange powdered pastels to represent the presence of rust. Once the entire structure was together, I weathered it with various powdered pastels and sealed everything with 2 coats of Testor’s dull-coat.

Atlas Water Tower Kit
A final detail that isn’t included in the kit, but is highly recommended, is the chains and counter-weights that support and raise/lower the water spout. You can represent these with black thread; however chain link has the most prototypical look. I found some small chain link in the jewelry clearance section at Walmart, which I then cut to length and painted black before installing it onto the model. Even though the chain is a bit larger than a prototypical sized chain, the look is quite convincing. Now that the model is complete and installed on the layout, I’m definitely happy that I decided to use it.
Sabado, Nobyembre 28, 2015

Walthers White Tower Restaurant


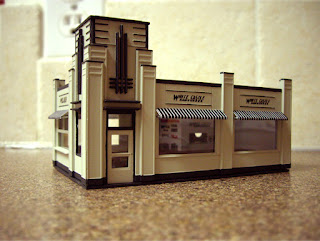
I recently completed my Walther’s White Tower Restaurant kit, which I completed in just a couple days, opposed to my last 2 structures which took over a month! I know the kit is a lot simpler then my last 2 structures, however as my skills get better, so does the time that it takes to complete them.

Walthers White Castle kit

Like my Merchant’s Row I kit, this one needed a lot of masking. The kit calls for white exterior walls and silver trim, but I decided to change this. I first sprayed the walls with Testor’s light aircraft gray paint. Once dry, I started carefully masking the exterior trim by cutting very small pieces of masking tape and smoothing it down with a small flat head jeweler’s screwdriver. I then hand painted the trim a dark gray.

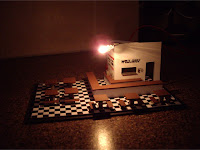
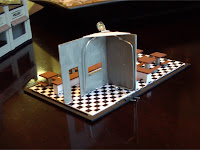
Interior lighting connectionsScratch built White Castle interior

I scratch built the entire interior, including the tables, benches, and counters, all from styrene. The black and white tile flooring is just a print out on plain printer paper of a pattern I made in Photoshop. For lighting, I used a small 12v automotive bulb that I attached to the top corner of the kitchen walls. I hid the leads behind the kitchen walls so they were out of sight, and have them exiting the building out of the rear base.

Back side of White Castle kitWalthers White Castle kit

Just like I did for my Merchant’s Row I kit, the exterior of the building simply slides over the interior, making for very easy access to the inside lighting/furniture in case anything ever needs to be fixed, changed, or added. I did not use the window glazing that was included in this kit, as it was very poor quality and opaque. I instead used clear styrene from Evergreen.

Walthers White Castle kitWhite Castle kit with awning supports

The window awnings were designed in Photoshop and printed on printer paper. I then cut the awnings out and glued them to a thin strip of styrene. I drilled small holes with a thumb drill into the exterior walls, and shaped supports out of thin steel wire, which then slid into the holes. I then glued the awnings to the supports and exterior wall.

Interior furnishings with lightingWhite Castle kit at night

The decals used were included with the kit; however I did some slight modifications. The “White Castle Hamburgers” decals also had “5 cents” and “buy a bagful!” in the design, but I opted to not include these as it made the signs look too cluttered. For the decals, I first applied a gloss coat to the structure, and added the decal once the gloss coat was dry. The decal was then covered with a second gloss coat. This was to reduce the visibility of the glossy decal backing. I then sprayed the entire structure with dull coat to get rid of any luster.

Atlas Telephone Pole and Shanty kit

I also did this small Atlas Telephone Shanty kit at the same time, which I purchased for $0.99 at a hobby clearance store in Calgary last month.

Huwebes, Setyembre 4, 2014

Croxton Yard Tower


Just a quick post of an image of the Croxton Yard Tower with an EL string of Alcos in May of 1965.

Croxton Yard Tower, May 1965. In collection of the author.