I recently completed my Walther’s White Tower Restaurant kit, which I completed in just a couple days, opposed to my last 2 structures which took over a month! I know the kit is a lot simpler then my last 2 structures, however as my skills get better, so does the time that it takes to complete them.
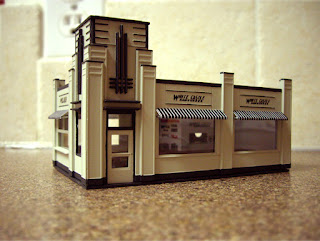
Like my Merchant’s Row I kit, this one needed a lot of masking. The kit calls for white exterior walls and silver trim, but I decided to change this. I first sprayed the walls with Testor’s light aircraft gray paint. Once dry, I started carefully masking the exterior trim by cutting very small pieces of masking tape and smoothing it down with a small flat head jeweler’s screwdriver. I then hand painted the trim a dark gray.
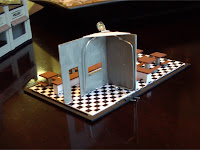

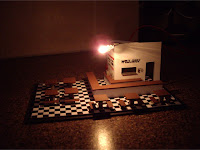
I scratch built the entire interior, including the tables, benches, and counters, all from styrene. The black and white tile flooring is just a print out on plain printer paper of a pattern I made in Photoshop. For lighting, I used a small 12v automotive bulb that I attached to the top corner of the kitchen walls. I hid the leads behind the kitchen walls so they were out of sight, and have them exiting the building out of the rear base.


Just like I did for my Merchant’s Row I kit, the exterior of the building simply slides over the interior, making for very easy access to the inside lighting/furniture in case anything ever needs to be fixed, changed, or added. I did not use the window glazing that was included in this kit, as it was very poor quality and opaque. I instead used clear styrene from Evergreen.


The window awnings were designed in Photoshop and printed on printer paper. I then cut the awnings out and glued them to a thin strip of styrene. I drilled small holes with a thumb drill into the exterior walls, and shaped supports out of thin steel wire, which then slid into the holes. I then glued the awnings to the supports and exterior wall.

The decals used were included with the kit; however I did some slight modifications. The “White Castle Hamburgers” decals also had “5 cents” and “buy a bagful!” in the design, but I opted to not include these as it made the signs look too cluttered. For the decals, I first applied a gloss coat to the structure, and added the decal once the gloss coat was dry. The decal was then covered with a second gloss coat. This was to reduce the visibility of the glossy decal backing. I then sprayed the entire structure with dull coat to get rid of any luster.

I also did this small Atlas Telephone Shanty kit at the same time, which I purchased for $0.99 at a hobby clearance store in Calgary last month.


0 (mga) komento:
Mag-post ng isang Komento