Ipinapakita ang mga post na may etiketa na Benchwork. Ipakita ang lahat ng mga post

Sabado, Hulyo 9, 2016

Ive Laid The Benchwork For My Train Now What


Believe it or not many people get stuck on what to do after they've made the benchwork for their train layout.  Some want to just start putting their track right on the wood..... STOP! DON'T DO IT!

First plan out if you have any hard to reach places on your layout. Unless you have a long arms reach, you may want to plan to put mountains, or a town, or something that doesn't require your constant attention. Ask yourself, if I have to clean the track in that area or get my derailed train, how easy will it be?

Next cover all the top surface with a layer of styrofoam. It can be the regular white sheets, but the blue or pink used for insulation is the best and doesn't leave little round bits when you cut it.


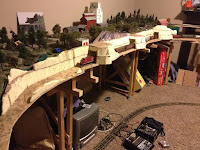

You can use the foam to carve rivers and gullies, build up pieces for easy mountains, and as for trees? Just stick them right in the foam! By using the foam you're going to have an easier time with many aspects of the layout.

Now, this is when you plan your track out, don't glue anything down yet though as you need to plan out buildings and scenery too.

For this stage in planning, paper is your best friend! Cut squares out for approximate building base sizes, circles where you may want a forest, strips for roads and rivers, etc.  Yes, this seems like work, just keep in mind that this will help you have a successful and running layout that you will enjoy. How crappy would it be if you were just laying things down and your track dead ended at a building or you have no place for that really neat roundhouse?  Make sure to design your track plan too.

One of our guys, Tyler has a fantastic layout and he did three posts for you to check out and get guidance and ideas from. Check them out:


  1. An HO Layout In Progress
  2. Thompson River Canyon Blog Edition 2
  3. Thompson River Canyon Blog Edition 3
  4. Thompson River Route Blog 4 (this is labeled as 5, but is part 4)


Now it's your turn!  What questions can we help answer?  Do you have photos to share with us? We love to see/share layout photos.  Let us know how we can help you get further in your hobby.

Email us

Thank for reading our blog and Happy Hobbying!


Linggo, Oktubre 11, 2015

Cookie Cutter Benchwork Kind Of


The main benchwork elevations are complete! To get the actual sections to match my original planned elevation sections (which I marked out earlier on the table), I first took large sheets of news print and laid them out to cover the entire sections. The paper was thin enough that I could see the lines I drew beneath it, and thus traced the sections onto the paper. I then cut the sections out and re-traced them onto a new sheet of plywood. Using a jigsaw, I cut the sections out, which all then matched perfectly on the table. I then attached the different elevation sections on top of scrap wood risers, which were cut to certain widths depending on the height I needed the section to be.

Benchwork track and terrain levelsBenchwork track risers

Benchwork track and terrain levels

You can see that the majority of the layout is raised to a certain degree, with really only the very front section on the base level. The back section is raised 3 ½” to allow for a double-mountain tunnel, as well as a bridge and trestle. The left half of the layout is raised 1 ½” and acts as an elevated half way point for the descending track from the trestle and the climbing track from the lake/swamp area. The top right area has a raised section leading to the start of the future trestle.


Left benchwork track risersRight benchwork track risers


Sabado, Mayo 30, 2015

HBS Benchwork progress


Adding a 4" extension (clamped portion) to make the backdrop modules into benchwork modules.

Without really trying, I accomplished a goal before the end of the year (it wasn't a real deadline or goal, but I'll take the accomplishment as if it were one of those "I'm going to do this before the end of the year" kind of things). I started converting the modules I acquired earlier this year into benchwork for the Hoboken Shore portion of the layout in the main layout room. 

4" extensions clamped (and glued, Tom!) up ready to attach to backdrop modules.


To begin with, I added a 4" extension to make the modules a full 4' long which resulted in a 20"x48" module. I ripped a 4" strip from several 2'x4'x18mm Luan plywood pieces from the local big box home improvement store. The 4" strips were then turned into the 4" extensions in short order and added to the existing backdrop modules.
Existing backdrop on bottom with extension piece to far left and an existing 1'x4' module on top to create a combined 32"x48" benchwork module.
These modified modules were then added to existing 12"x48" modules to create a new 32"x48" module. New legs to put the top of benchwork (TOB) at 50-3/4" above finished floor (AFF). This height was arrived at from my reach experiments on the 149th as these pocket yards are a little deeper than regular 2x4 benchwork dominos. I see it as a compromise from my preferred height that is up around 54" and a lower height that may be more comfortable for shorter operators.

Legs and feet (knees and toes). Adjustable feet in 2x3s.
Something of interest I'm doing is using 2x3s for legs instead of standard 2x2s. At my local big box home improvement store, they only had pine 2x2s and no oak 2x2s which David Barrow uses on the CM&SF. The oak is strong and straight, the pine are a cheaper, inferior, but perfectly useable alternative - except when the only thing left are the dregs that are warped, split and worthless. So in steps the 2x3s that are only about 50 cents more than the 2x2s and a lot cheaper than oak. They are labeled Spruce-Pine and smell pretty good, plus they were really straight and tight-grained and strong. The extra heft is pretty nice (at a very small premium), so I'm going to look to continue using them at this point.


So I managed to convert and install 4-1/2 dominos - I need to make a 12"x48" piece for the last one - and get one entire side of the layout benchwork in. I'm using the 1/4" Luan plywood from the backdrops on the legs to provide a uniform skirt that will cover up a lot of the clutter in the room underneath the layout. Much easier than actually taking care of the stuff is to just hide it in place! The plywood is blue (these were sky backdrops), but I will paint a dark color - perhaps a very dark Erie Green or even black.
Clutter soon to be hidden under the layout. Unfortunately, the "Eastbound Trains" sign (from the Erie's Goshen Station) points to the West.  Not sure where I am going to hang it so that it doesn't confuse operators.
I've got three more backdrop modules to convert and a couple of more 18"x48" modules, which need legs, and then I only need to build a few feet of new benchwork to complete the HBS portion. I'm not planning on laying track here immediately, though. I still want to do another pocket terminal next to start to prove out the idea of having scattered, lightweight and easily moveable yards serviced by car floats to begin with.
149th with new cars indicated by their car cards.
The 149th is sporting some new cars picked up from the annual train show, and it is close to being presentable to visiting operators. I would like to get another yard up before having an official session. I realized that with the regional convention slated to be in Austin in 2014, I should set a goal of having operating sessions for the convention. This means I need to pick up the pace. Deadlines do help move things along...


Huwebes, Enero 29, 2015

Benchwork


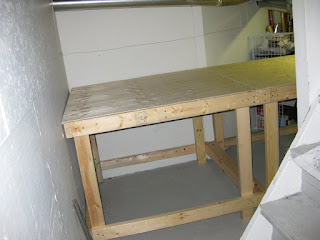
After 2 weeks of planning, measuring, cutting, and measuring again, the main bench is finally completed. The bench is actually two 4x4 tables which bolt together with removable legs and frame. This allows it to be broken down for removal from the basement (which is going to be a painful task if it is to ever happen). Because of proper planning and attention to detail, the table is very strong and stable, which makes a very good working table.

4 by 8 benchworkBenchwork underside and supports
Model train benchwork

Miyerkules, Setyembre 10, 2014

Benchwork


The benchwork for the HOG was designed to be simple and to be made with common tools that any homeowner should already have. You do have an arc welder, right? Just kidding.


Here is the cutting diagram. The Original HOG was made from ripped ply wood because things in the South tend to be sensitive to the humidity. However, dimensional lumber works very well. All you have to do is print and follow the instructions above.

Assembly goes VERY quickly. We had most of it done in two work sessions. One thing that we decided to do later was to add angular reinforcements on the wobbly legs. This is the same version of leg in pocket system used on in the Domino design, but it is too wobbly and needs reinforcing.
Using the cutting diagram above, we cut the foam top for the layout.


Once the wood sections are done, we put a 1" layer of extruded foam on top using Liquid Nails for Projects which is foam safe.


Once covered, we can add the scenery!


With the scenery and fascia boards added we are read to roll!


Zeeland farms.


The Norfolk Southern siding in Vidalia.


Lake Blacksheer...which looks exactly like the layout although draw here almost a year before construction.


Cordele and Lake Blackshear


I kicked around building an all foam layout, but the legs were a pain.