Once my base table was completed, I re-applied the Atlas track templates back onto the table so I had a good approximation of how my final track was going to fit.

I then cut my side and back scenery walls to a size that seemed appropriate for what I was trying to accomplish. At this point I still am not exactly sure what I am going to use for a back drop, however I left plenty of surface area if required later. I then simply screwed the pieces onto the sides of my bench, using metal bracers where the panels joined together.


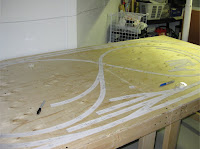
After the side and back panels were attached, I used the track templates to plan the different elevations that were going to be required for the layout, as there were several hills and ramps. I visualized the different elevations I wanted and marked them out directly onto the table (as pictured below). These sections would later be cut out on a separate piece of plywood and attached with risers to their specific heights.


0 (mga) komento:
Mag-post ng isang Komento