
 I started by first planning the design of my building on paper, noting all the wall, door, window, and roof dimensions to ensure that they scaled down to realistic HO measurements. Using a new blade, I carefully marked the measurements on the backside of the styrene sheet, then scored the outline of the wall using a straight edge. I used a square and ruler to double check the measurements after every score line I made, ensuring that the walls were kept square and equal. I then gently flexed the styrene to break each piece apart. I fixed any rough edge with sand paper and a hobby knife.
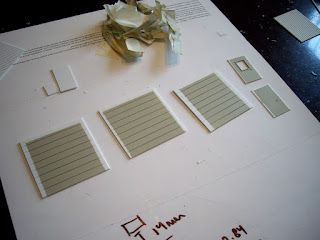
The overhead doors were cut from scrap v-groove pattern styrene, and the entry doors from standard smooth styrene. For the main entry door, I cut a half-length opening for a window, and added strip styrene for the insert trim. I masked the very outside edge of all the doors so I could easily add glue to these unpainted areas when attaching the doors to the backside of the walls. The doors were then all sprayed with light aircraft gray paint.
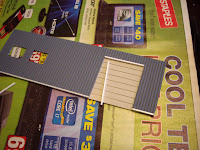
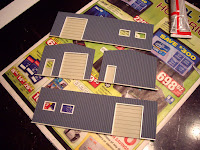
I hand painted the corrugated steel walls with a mix of blue and steel gray enamel paint, mixed 1:1 with thinner. After letting the 3 coats of paint dry for 24 hours, I glued the overhead and entry doors to the backside of each wall. I then added trim to the doors using 1.5mm x 1.0mm strip styrene. I used the same strip styrene on the base of the building to represent a foundation, as well as for building the window frames.


The 4 wall pieces were then glued together, and extra styrene support pieces were added to the interior for extra rigidity. The roof was a single piece of v-groove styrene, scored and carefully angled down the center to fit the slope of the building. After airbrushing the roof a light gray, I carefully glued it to the main structure. After making a couple touch-ups to the paint and trim, I weathered the walls, doors, and roof with a variety of powdered pastels. I then sealed in all the weathering details with 2 light coats of dull-coat.
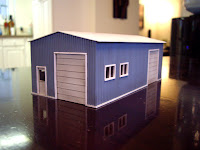

Once the structure was dry, I added clear styrene pieces to the backside of the walls for window glazing. The final step was to add a black cardstock divider and floor to the interior of the building so no white plastic could be visible through any of the windows. I am quite happy with how this little project turned out, and can’t wait to mix it in with my other model buildings.


0 (mga) komento:
Mag-post ng isang Komento